
Microsoft 365 OAuth Email Integration Runbook (Microsoft Graph)
|
Field |
Details |
|
Document Type |
Runbook |
|
Applies To |
Microsoft 365 OAuth Email Integration Runbook (Microsoft Graph) |
|
Audience |
Entra ID & Exchange Online Admins |
|
Author |
AK. Udofeh |
|
Doc Version |
1.0 |
|
Last Updated |
June 2026 |
Design Decision Record (DDR)
| Decision | Rationale |
|---|---|
| Authentication Method | OAuth 2.0 using Microsoft Entra ID to align with Microsoft's modern authentication model. |
| Email API | Microsoft Graph SendMail API preferred over SMTP AUTH for modern SaaS integrations. |
| App Registration | Dedicated App Registration per third-party application to isolate credentials and simplify lifecycle management. |
| Mailbox Strategy | Dedicated Shared Mailboxes are preferred for service-generated emails to simplify administration and auditing. Also eliminates licensing requirements. |
| Permission Model | Least privilege using Microsoft Graph Mail.Send Application permission. |
| Application RBAC | Restricts application access using least privilege. |
| Authentication Secret | Client Secret initially, with certificates preferred where supported by the vendor. |
| Monitoring | Exchange Message Trace, Mailbox Audit Logs, Microsoft Entra Sign-in Logs and Microsoft Purview Audit (where available). |
Solution Architecture
Third-Party Application
          │
          │ OAuth 2.0
          ▼
Microsoft Entra ID
(App Registration)
          │
Access Token
          ▼
Microsoft Graph API
(Mail.Send)
          │
          ▼
Exchange Online
          │
Shared Mailbox
          │
Recipients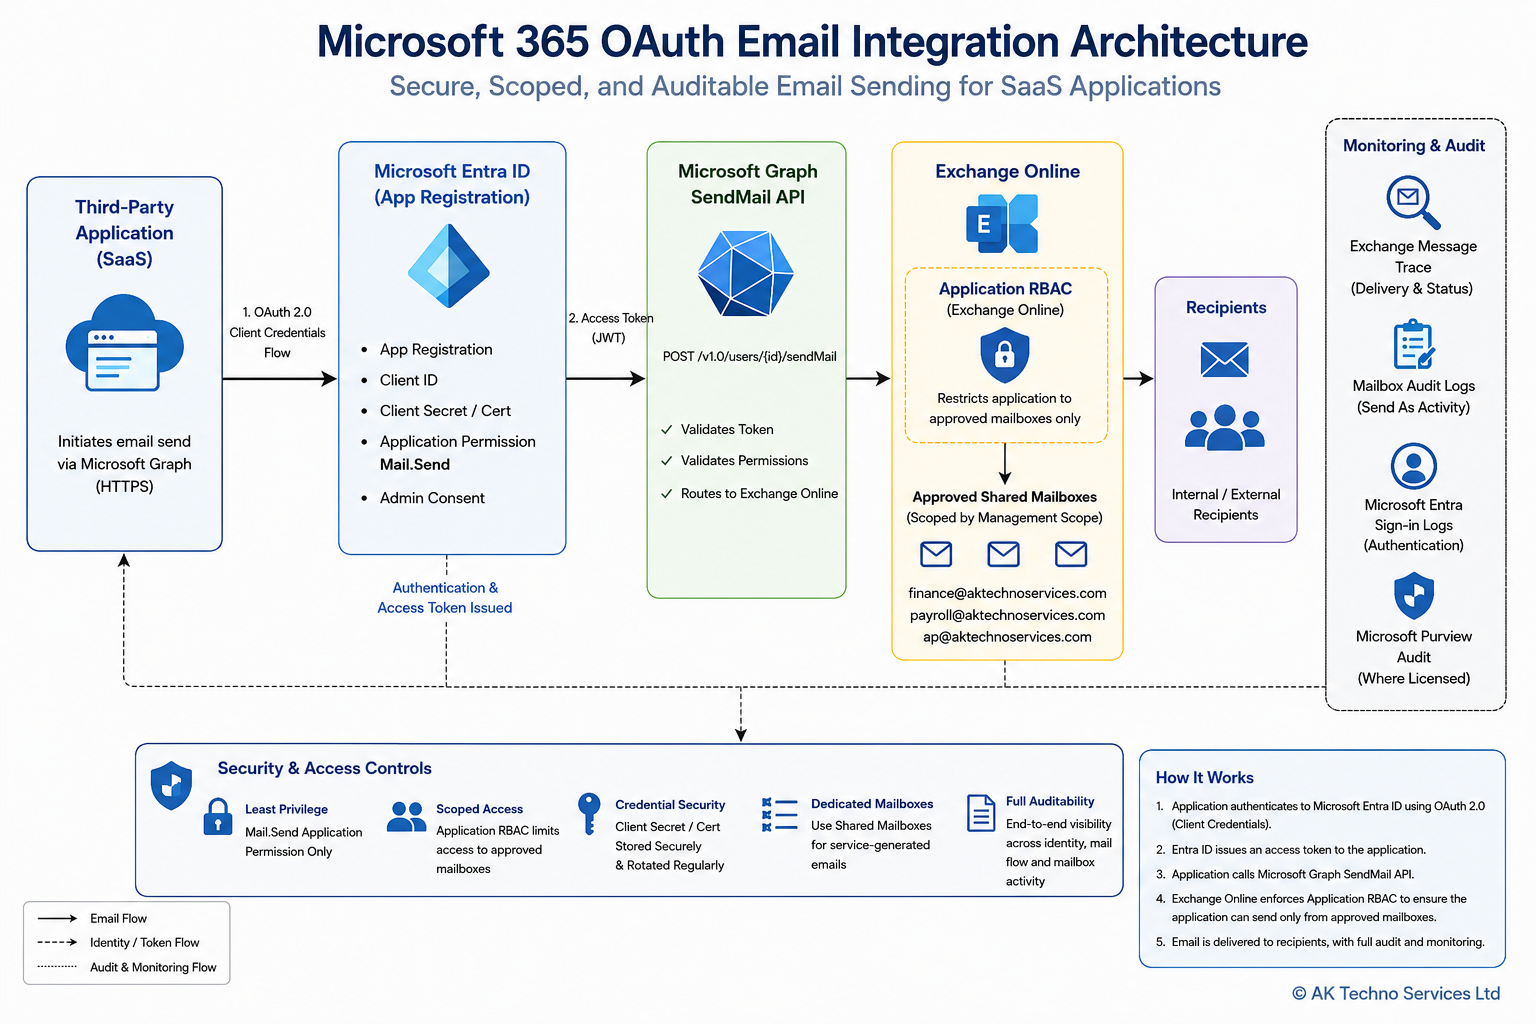
Overview
This runbook describes the standard approach for integrating third-party applications with Microsoft 365 using OAuth 2.0 and Microsoft Graph to send email through Exchange Online.
The objective is to provide a secure, repeatable and vendor-agnostic implementation that supports modern authentication while reducing administrative overhead and improving auditability.
Prerequisites
Ensure the following prerequisites have been completed:
- Microsoft 365 tenant with Exchange Online.
- Microsoft Entra ID administrator privileges.
- Exchange Administrator or Global Administrator role.
- Microsoft Graph API access.
- Dedicated App Registration.
- Dedicated Shared Mailbox(es) for application-generated email.
- Vendor confirmation that Microsoft Graph SendMail is supported.
Workflow
Step 1: Create the Microsoft Entra ID App Registration
Microsoft Entra Admin Centre
Identity > Applications > App Registrations > New Registration
Configure:
- Application Name
- Supported Account Type
- Redirect URI (if required by the application)
Record:
- Tenant ID
- Application (Client) ID
Generate a Client Secret and securely record:
- Secret Value
- Secret Expiry Date
Step 2: Configure Microsoft Graph Permissions
API Permissions
Add:
Microsoft Graph Application Permission
Mail.SendGrant:
Administrator Consent
Do not assign additional Microsoft Graph permissions unless explicitly required by the application.
Step 3: Configure Exchange Online Mailboxes
Create one or more dedicated Shared Mailboxes for application-generated email.
Examples:
- finance-notification@
- payroll-notification@
- ap-notification@
Avoid using personal user mailboxes.
Configure Exchange Online Application RBAC
Objective
Although the Microsoft Entra ID application is granted the Microsoft Graph Mail.Send application permission, that permission applies broadly across Exchange Online by default.
To enforce the principle of least privilege, configure Exchange Online Application RBAC so that the application can send mail only from the approved shared mailbox(es) required by the third-party application.
This provides an additional layer of authorization beyond Microsoft Graph API permissions and significantly reduces the impact of a compromised application credential.
Step 3.1: Connect to Exchange Online
Open an Exchange Online PowerShell session.
# Install-Module -Name ExchangeOnlineManagement
Install-Module ExchangeOnlineManagement

# Then load it:
Import-Module ExchangeOnlineManagement

# Connect to EXO
Connect-ExchangeOnline
Step 3.2: Create a Management Scope
Create a Management Scope that contains only the mailbox or shared mailbox that the application should be permitted to use.
Example – Multiple Shared Mailbox
New-ManagementScope `
-Name "MS Graph Mail Scope" `
-RecipientRestrictionFilter "PrimarySmtpAddress -eq 'finance@contoso.com' -or PrimarySmtpAddress -eq 'payroll@contoso.com' -or PrimarySmtpAddress -eq 'ap@contoso.com'"
Verify the scope.
Get-ManagementScope "MS Graph Mail Scope"Step 3.3: Locate the Exchange Service Principal
Before an Exchange Online Application RBAC role assignment can be created, Exchange Online must have a corresponding Service Principal for the Microsoft Entra ID application. If the application is not returned by Get-ServicePrincipal, register it in Exchange Online using the Microsoft Entra ID Application (Client) ID and the Enterprise Application (Service Principal) Object ID.
Verify whether the Service Principal exists
Get-ServicePrincipalor
Get-ServicePrincipal |
Where-Object DisplayName -eq "MS Graph Mail"
Record the following values:
- Display Name
- AppId
- ObjectId
If no results are returned, register the application.
When registering the Exchange Online Service Principal, the -AppId parameter must use the Application (Client) ID from the Microsoft Entra ID App Registration, while the -ObjectId parameter must use the Enterprise Application (Service Principal) Object ID, not the App Registration Object ID. Using the incorrect Object ID will prevent Exchange Online from locating the Service Principal.
Register the Service Principal
New-ServicePrincipal `
-AppId "<Application (Client) ID>" `
-ObjectId "<Enterprise Application Object ID>" `
-DisplayName "MS-Graph-Mail-Lab"
Verify the registration
Get-ServicePrincipal |
Where-Object DisplayName -eq "MS-Graph-Mail-Lab"
The application should now be available for Exchange Online Application RBAC role assignments.
Step 3.4:
Assign the Exchange RBAC Role
Assign the Application Mail.Send role to the application and restrict it to the Management Scope created above.
New-ManagementRoleAssignment `
-Name "MS Graph Mail Assignment" `
-App <ObjectId> `
-Role "Application Mail.Send" `
-CustomResourceScope "MS Graph Mail Scope"
Step 3.5: Validate the Assignment
Verify the RBAC assignment has been created successfully.
Get-ManagementRoleAssignment |
Where-Object Name -eq "MS Graph Mail Assignment"
Expected Result
- Application Mail.Send
- Management Scope = MS Graph Mail Scope
- Assignment Status = Active
The above configuration prevents the application from sending email as arbitrary mailboxes within the tenant, even though it has been granted the Microsoft Graph Mail.Send application permission.
Test the RBAC
Test-ServicePrincipalAuthorization `
-Identity "MS-Graph-Mail-Lab" `
-Resource youremail@contoso.com
Exchange Online RBAC for Applications does not consistently enforce mailbox restrictions for Microsoft Graph Mail.Send operations.
To guarantee least-privilege access, Application Access Policies must be configured alongside RBAC when using the Mail.Send application permission.
# Run:
Install-Module ExchangeOnlineManagement -Scope CurrentUser

# Then
Import-Module ExchangeOnlineManagement
Connect-ExchangeOnline

# Create a mail-enabled security group
New-DistributionGroup -Name "Graph-Mail-Allowed" -Type Security

# Add ONLY the allowed mailbox
Add-DistributionGroupMember -Identity "Graph-Mail-Allowed" -Member graphemail.lab@aktechnoservices.com

#  Create the policy
New-ApplicationAccessPolicy `
  -AppId <YOUR CLIENT ID from App Registration> `
  -PolicyScopeGroupId "Graph-Mail-Allowed" `
  -AccessRight RestrictAccess `
  -Description "Restrict mail send to approved shared mailbox only"

# Test it
Test-ApplicationAccessPolicy `
  -AppId <YOUR CLIENT ID from App Registration> `
  -Identity graphemail.lab@aktechnoservices.com

# Test the blocked one:
Test-ApplicationAccessPolicy `
  -AppId <YOUR CLIENT ID from App Registration> `
  -Identity test-sharedmailbox@aktechnoservices.com
Wait ~15–30 mins to allow it propagate and then test.
Step 4: Configure the Third-Party Application
Provide the vendor with:
- Tenant ID
- Application (Client) ID
- Client Secret Value
- App Registration Name
- Approved Shared Mailbox addresses
Ensure the application is configured to use Microsoft Graph SendMail rather than SMTP where supported.
Step 5: Security Configuration
Apply the principle of least privilege.
Recommendations:
- One App Registration per application.
- One Client Secret per application.
- Shared Mailboxes for service identities.
- Secure storage of Client Secrets.
- Regular secret rotation.
- Review Graph permissions periodically.
Step 6: Testing
Validate the implementation using a non-production Shared Mailbox.
Confirm:
- OAuth authentication succeeds.
- Microsoft Graph token is issued.
- Email is delivered successfully.
- Sender address is correct.
- Message appears in Sent Items (where configured).
- External recipients receive the message.
Complete User Acceptance Testing before production deployment.
Step 7: Monitoring & Validation
Validate successful operation using:
- Exchange Message Trace
- Exchange Mailbox Audit Logs
- Microsoft Entra Sign-in Logs
- Microsoft Purview Audit (where licensed)
Investigate any authentication failures, delivery issues or unexpected mailbox activity before production rollout.
Step 8: Production Go-Live
Move to production once:
- Testing is complete.
- Security review has been approved.
- Vendor validation has been completed.
Following deployment, monitor:
- Authentication failures
- Mail delivery
- Audit logs
- Secret expiry
- Application health
Operational Maintenance
Perform the following operational tasks regularly:
- Rotate Client Secrets before expiry.
- Review Microsoft Graph permissions.
- Review mailbox access permissions.
- Monitor Exchange Message Trace.
- Review Microsoft Entra Sign-in Logs.
- Remove unused App Registrations.
- Decommission unused Shared Mailboxes.
Important Considerations
- Avoid sharing App Registrations across multiple applications.
- Do not expose Client Secret values in documentation or email.
- Validate vendor support for Microsoft Graph before implementation.
- Shared Mailboxes should be used exclusively for application-generated email where practical.
- Ensure application credentials are securely stored and rotated in accordance with organisational policy.
Best Practices
- Prefer Microsoft Graph over SMTP AUTH for new integrations.
- Create dedicated Shared Mailboxes for each business function.
- Maintain one App Registration per application.
- Use Exchange Online Application RBAC to restrict Microsoft Graph applications to approved Shared Mailboxes. Microsoft Graph
Mail.Sendalone does not restrict which Exchange Online mailboxes an application may use. Exchange Online Application RBAC should be implemented to limit the application's operational scope. - Enable auditing before production deployment.
- Document all configuration values securely.
- Perform regular operational reviews.
References
- Microsoft Graph API Documentation
- Microsoft Entra ID Documentation
- Exchange Online Administration Documentation
- Microsoft 365 Security Best Practices
Summary
This runbook provides a standardised approach for integrating third-party applications with Microsoft 365 using OAuth 2.0 and Microsoft Graph. By adopting dedicated App Registrations, Shared Mailboxes and least-privilege permissions, organisations can deliver a secure, auditable and repeatable email integration model that can be reused across multiple SaaS applications.