Microsoft Entra ID & Identity
This book section is for MS Entra ID & Identity services documentation. Plus documentation for application authentication across the Tech Infrastructure stack, including SSO integrations, identity providers, authentication protocols, and configuration guidance.
- OIDC SSO with Entra ID - Integration Guide
- SAML v2.0 SSO with Entra ID - Integration Guide
- WebApp Authentication with Social IDPs (Google, Facebook & Apple ID)
- Entra ID Self-Service Password Reset (SSPR) Implementation
- SAML Transformation Fallback Workaround (Microsoft Entra ID)
- Configuring Phishing‑Resistant MFA (PR‑MFA) in Entra ID Conditional Access
- Enabling Token Protection in Entra ID Conditional Access
- Passwordless MFA Method Registration in Entra ID
- Configure Phishing-Resistant MFA Policy in Entra ID
- How-To: Set Up App Registrations for Automated Entra ID Administration
- Blocking Device Code Flow in Microsoft Entra ID
- Blocking Authentication Transfer in Microsoft Entra ID
- Configuring Entra ID CA Policies for Authentication Flows
OIDC SSO with Entra ID - Integration Guide
|
Field |
Details |
|
Document Type |
How-To Guide - SSO Integration |
|
Applies To |
Microsoft Entra ID, Any OIDC-compatible SaaS or Third-Party Application |
|
Audience |
2nd Line / Systems Administrator / IT Engineer |
|
Author |
AK. Udofeh |
|
Last Updated |
March 2026 |
Overview
This article covers how to configure Single Sign-On (SSO) using the OpenID Connect (OIDC) protocol between Microsoft Entra ID and any third-party or SaaS application that supports OIDC for authentication. It is intended for systems administrators who need to integrate enterprise applications with Entra ID to centralise identity management, enforce MFA, and control user access. The guide covers App Registration in Entra ID, redirect URI configuration, required API permissions, and the standard OIDC configuration values expected by most OIDC-compliant applications.
Root Cause
OIDC SSO works by delegating authentication to Entra ID as the Identity Provider (IdP). The application (Service Provider) redirects the user to Microsoft's authorisation endpoint, which authenticates the user and returns an ID token containing identity claims. The application then validates the token using signing keys retrieved from Microsoft's OIDC discovery document.
Common Failure Points
-
- Redirect URI mismatch between the application config and Entra App Registration
- OIDC Issuer URL malformed (e.g. missing /v2.0, or a full URL stored where only a GUID is expected)
- Application server cannot reach Microsoft's discovery endpoint outbound
- API permissions not granted admin consent in Entra
- Client secret expired or incorrect
- Auto-discovery disabled, causing the application to expect manually specified signing keys
Before You Start
|
Check |
Where |
|
You have Global Administrator or Application Administrator rights in Entra ID |
Entra ID → Roles and Administrators |
|
The target application supports OIDC (not only SAML) |
Application vendor documentation |
|
You know the exact Redirect URI format expected by the application |
Application vendor documentation |
|
Outbound HTTPS (port 443) from the application server to login.microsoftonline.com is permitted |
Firewall / network policy |
|
You have admin access to the application's configuration settings |
Application admin console or hosting environment |
|
A client secret can be created and stored securely |
Azure Key Vault or organisation secrets manager |
Step 1: Create an App Registration in Entra ID
Note the following values from the Overview page - you will need these later:
• Application (client) ID - this is your OIDC Client ID
• Directory (tenant) ID - this is used to construct your OIDC Issuer URL
Step 2: Create a Client Secret
- Inside the App Registration, go to Certificates & Secrets > Client Secrets > New client secret.
- Enter a description (e.g. AppName OIDC Secret) and set an appropriate expiry period.
- Click Add.
Copy the secret Value immediately - it will not be displayed again after you navigate away. Store it securely in a secrets manager or vault.
Step 3: Configure the Redirect URI
-
- Inside the App Registration, go to Authentication > Add a platform > Web.
- Enter the Redirect URI in the format specified by your application's documentation. A common pattern is:
https://<your-app-domain>/oidc/callback -
This value must exactly match what the application expects. Refer to the application's OIDC integration documentation for the precise path. Common variants include /auth/callback, /sso/callback, and /oauth/callback.
-
Ensure "Access tokens" and "ID tokens" under Implicit grant and hybrid flows are NOT ticked unless the application vendor explicitly requires them.
Click Save. -
Confirm the Redirect URI appears under Redirect URI configuration with Platform Type: Web.
Step 4: Grant API Permissions
- Go to API Permissions > Add a permission > Microsoft Graph > Delegated permissions.
- Add the following permissions:
|
Permission |
Purpose |
|
openid |
Required - enables OIDC sign-in |
|
profile |
Provides basic profile claims (name, etc.) |
|
|
Provides the user's email address claim |
- Click Grant admin consent for <your tenant> and confirm.
All three permissions should show a green tick with "Granted for <tenant>" status.
Step 5: Configure the Application
Add the following configuration values to your application. The exact setting names vary per application — refer to your application's OIDC documentation. The values below represent the standard OIDC parameters used across most platforms:
|
Configuration Key |
Value |
|
Auth Method / SSO Protocol |
oidc |
|
Client ID |
Application (client) ID from Entra App Registration |
|
Client Secret |
Secret value created in Step 2 |
|
Issuer URL |
https://login.microsoftonline.com/<Directory (tenant) ID>/v2.0 |
|
Auto-Discovery |
true (recommended — eliminates need to manually specify endpoints) |
|
Redirect / Callback URI |
Must match exactly what was registered in Step 3 |
|
Scopes |
openid profile email |
Critical: Issuer URL format: The Issuer URL must contain only the tenant GUID in the path and must end with /v2.0. A common misconfiguration is storing a full URL in a variable and substituting it into the Issuer field, producing a doubled path such as https://login.microsoftonline.com/https://login.../v2.0/v2.0. This will cause discovery to fail. Correct format: https://login.microsoftonline.com/e21b46c3-367f-4ced-b138-2c57e76746f6/v2.0
Step 6: Restrict Access via Enterprise Application (Recommended)
By default, any user in your Entra tenant can attempt SSO into the application. To restrict access to specific users or groups:
- In Entra ID, go to Enterprise Applications > find your application by display name.
- Go to Properties > set "Assignment required?" to Yes > Save.
- Go to Users and groups > Add user/group > assign the relevant users or Entra security groups.
Only assigned users will be permitted to authenticate. All others will receive an Entra-side access denied message before reaching the application.
Step 7: Optional: Group-to-Role Synchronisation
If the application supports mapping identity provider groups to application roles, you can automate role assignment via Entra group membership:
- In the App Registration > Token configuration > Add groups claim > select Security groups > Save.
- In the application's OIDC settings, enable group synchronisation and set the groups claim name to groups.
- In the application's role configuration, map each role to the corresponding Entra group Object ID (GUID).
Entra sends group Object IDs, not display names, in the token. Always use the group's Object ID when mapping groups to application roles - not the group's display name.
Troubleshooting
OIDC Discovery Error / Discovery endpoint unreachable
Cause: The application cannot fetch the OIDC discovery document from Microsoft, or the Issuer URL is malformed.
Resolution:
- Verify the Issuer URL is not doubled > check error messages for patterns like https://login.microsoftonline.com/https://...
- Confirm the Issuer URL ends with /v2.0 and contains only the tenant GUID (not a full URL).
- Test outbound connectivity from the application server to Microsoft:
bash
curl -s "https://login.microsoftonline.com/<tenant-id>/v2.0/.well-known/openid-configuration" | head -c 200
- If the curl fails, verify firewall rules permit outbound HTTPS (port 443) to login.microsoftonline.com.
Missing required configuration "keys" value or similar
Cause: Auto-discovery is disabled or not correctly configured. The application is expecting manually specified JWKS signing keys.
Resolution:
- Ensure auto-discovery is enabled in the application's OIDC settings.
- Confirm the Issuer URL is correct - a malformed URL will cause discovery to silently fail.
- Clear the application's configuration cache and restart the service.
redirect_uri_mismatch
Cause: The Redirect URI registered in Entra does not exactly match the callback URL the application is generating or sending.
Resolution:
- Confirm the application's configured domain uses https:// and matches exactly.
- Update the Redirect URI in Entra: App Registration > Authentication > Web > Edit.
- Ensure no trailing slashes, port numbers, or scheme mismatches exist between the two values.
invalid_client
Cause: The Client ID or Client Secret is incorrect, or the client secret has expired.
Resolution:
- Verify the Client ID matches the Application (client) ID in the App Registration overview not the Object ID or any other GUID.
- Check the secret expiry date in Certificates & Secrets - create a new secret if expired.
- Confirm the secret Value is used (not the Secret ID, which is a different field).
User authenticates successfully in Entra but receives an error or no access in the application
Cause: The user account was provisioned in the application with no role or permissions assigned.
Resolution:
- Log in to the application as an administrator.
- Assign an appropriate role to the SSO-provisioned user account.
- To automate this for future users, configure a default role for SSO-registered accounts in the application's settings, or implement group-to-role synchronisation (Step 7).
invalid_grant or token validation failure
Cause: Clock skew between the application server and Microsoft's servers, or the authorisation code was already consumed.
Resolution:
- Ensure the application server's system clock is synchronised via NTP. A skew of more than 5 minutes will cause token validation to fail.
- Confirm the application is not attempting to reuse an authorisation code - these are single-use and expire within seconds.
Expected Outcome
|
Factor |
Detail |
|
Resolution Time |
30–60 minutes for initial configuration; 15 minutes for troubleshooting known issues |
|
User Impact |
Zero - SSO login is additive; existing local accounts remain functional during migration |
|
Recurrence Risk |
Low - primary recurring issue is client secret expiry; set a calendar reminder before the secret's expiry date |
|
Ongoing Maintenance |
Rotate client secrets before expiry; manage user access via Enterprise Application user/group assignments |
SAML v2.0 SSO with Entra ID - Integration Guide
| Field |
Details |
|
Document Type |
How-To Guide: SSO Integration |
|
Applies To |
Microsoft Entra ID, Any SAML 2.0-compatible SaaS or Third-Party Application |
|
Audience |
2nd Line / Systems Administrator / IT Engineer |
|
Author |
AK. Udofeh |
|
Last Updated |
March 2026 |
Overview
This article covers how to configure Single Sign-On (SSO) using the SAML 2.0 protocol between Microsoft Entra ID and any third-party or SaaS application that supports SAML for authentication. It is intended for systems administrators who need to integrate enterprise applications with Entra ID to centralise identity management, enforce MFA, and control user access. The guide covers Enterprise Application creation in Entra ID, SAML endpoint configuration, certificate handling, and attribute claim mapping.
SAML SSO works by delegating authentication to Entra ID as the Identity Provider (IdP). The application (Service Provider / SP) redirects the user to Entra's SAML endpoint, which authenticates the user and returns a signed SAML assertion containing identity attributes. The application validates the assertion signature using Entra's signing certificate and establishes a user session.
Common Failure Points
- Incorrect ACS (Assertion Consumer Service) URL registered in Entra
- Entity ID mismatch between the application and Entra configuration
- Entra signing certificate not imported into the application, or certificate has expired
- Attribute claims not mapping to the fields the application expects
- SLO (Single Logout) URL misconfigured, causing logout failures
- User not assigned to the Enterprise Application in Entra
Before You Start
|
Check |
Where |
|
You have Global Administrator or Application Administrator rights in Entra ID |
Entra ID > Roles and Administrators |
|
The target application supports SAML 2.0 (not only OIDC) |
Application vendor documentation |
|
You have the application's ACS URL, Entity ID, and SLO URL |
Application vendor documentation or SP metadata XML |
|
Outbound HTTPS (port 443) from the application server to login.microsoftonline.com is permitted |
Firewall / network policy |
|
You have admin access to the application's configuration |
Application admin console or hosting environment |
Step 1: Create an Enterprise Application in Entra ID
For SAML SSO, configuration is done through Enterprise Applications, not App Registrations. An App Registration is created automatically in the background.
You will be taken to the application overview page.
Step 2: Configure SAML Settings
- Inside the Enterprise Application, go to Single Sign-On > SAML.
- Click Edit on the Basic SAML Configuration panel.
- Fill in the following fields using values from your application's documentation or SP metadata:
Identifier (Entity ID)*: https://app.yourdomain.com/saml/metadata
(this is a Unique URI that identifies the Service Provider)
Reply URL (Assertion Consumer Service URL)*: https://app.yourdomain.com/saml/acs(this is where Entra ID posts the signed SAML assertion)
Sign-on URL (optional): https://app.yourdomain.com/login
(SP-initiated login entry point)
Logout URL (optional): https://app.yourdomain.com/saml/sls
(SP's Single Logout endpoint)
If the application provides a metadata XML URL (e.g. https://app.yourdomain.com/saml/metadata), Entra can import these values automatically — click Upload metadata file at the top of the Basic SAML Configuration panel.
Click Save.
Step 3: Download the Entra Signing Certificate
- Still in the SAML configuration view, scroll to Section 3 > SAML Certificates.
- Download Certificate (Base64) > this produces a .cer or .pem file.
- Open the file in a text editor. The content between -----BEGIN CERTIFICATE----- and -----END CERTIFICATE----- is the base64-encoded certificate value you will need for the application.
Store a copy of this certificate securely. If Entra's signing certificate is rotated (e.g. on expiry), the application will fail to validate assertions until the new certificate is imported.
Step 4: Collect IdP Configuration Values
In the SAML configuration page, note the following values in the "Set up <app name>":
|
Value |
Description |
|
Login URL |
Entra's SAML SSO endpoint - set as the IdP SSO URL in the application |
|
Logout URL |
Entra's SAML SLO endpoint - set as the IdP SLO URL in the application |
|
Entra ID Identifier |
Entra's Entity ID - set as the IdP Entity ID in the application |
|
Certificate (Base64) |
Signing certificate from Step 3 - used by the application to validate assertions |
Alternatively, download the Federation Metadata XML from the same section - many applications can import this file directly to auto-populate all IdP settings.
Step 5: Configure Attribute Claims in Entra
By default, Entra sends a standard set of SAML attribute claims. Verify these match what the application expects:
-
- In the Enterprise Application SAML configuration, click Edit on Section 2 - Attributes & Claims.
The default claims sent by Entra are:
|
Claim Name |
Value |
|
emailaddress |
user.mail |
|
givenname |
user.givenname |
|
surname |
user.surname |
|
name |
user.userprincipalname |
- If the application requires different attribute names or additional claims, click Add new claim to add or rename them.
- To include group membership in the assertion (for role mapping), click Add a group claim > select Security groups.
By default, Entra sends group Object IDs (GUIDs) in the group claim, not display names. Configure the application's role mapping to use Object IDs, or change the group claim's source attribute to display names if supported.
Step 6: Restrict Access via Enterprise Application (Recommended)
- In the Enterprise Application, go to Properties.
- Set "Assignment required?" to Yes > Save.
- Go to Users and groups > Add user/group > assign the relevant users or Entra security groups.
Only assigned users will be permitted to authenticate via SAML SSO. Unassigned users receive an Entra-side access denied error before reaching the application.
Step 7: Configure the Application
In the Service Provider application, enter the values collected in Step 4 into the application's SAML configuration. The exact setting names vary per application - refer to the application vendor's SAML documentation. The standard SAML parameters are:
|
Application Setting |
Value to Enter |
|
IdP Entity ID |
Entra ID Identifier from Step 4 |
|
IdP SSO URL |
Login URL from Step 4 |
|
IdP SLO URL |
Logout URL from Step 4 |
|
IdP X.509 Certificate |
Certificate base64 content from Step 3 |
|
SP Entity ID |
Must match the Identifier (Entity ID) entered in Entra Step 2 |
|
ACS URL |
Must match the Reply URL entered in Entra Step 2 |
|
Name ID Format |
emailAddress or persistent - check application documentation |
|
Binding |
HTTP-POST for ACS; HTTP-Redirect for AuthnRequest |
=========================Troubleshooting====================
AADSTS750054: SAMLRequest or SAMLResponse must be present as query string parameters
Cause: The application is not correctly forming the SAML AuthnRequest, or the binding type does not match Entra's expectation.
Resolution:
- Confirm the application is using HTTP Redirect binding for the AuthnRequest - Entra requires this for SP-initiated flows.
- Check the application's SAML configuration for a "request binding" or "binding type" setting and ensure it is set to HTTP-Redirect.
AADSTS70011: The provided value for the input parameter 'redirect_uri' is not valid
Cause: The ACS URL registered in Entra does not match the URL the application is posting to.
Resolution:
- Retrieve the application's SP metadata from its metadata URL or admin panel.
- Compare the AssertionConsumerService URL in the metadata against the Reply URL (ACS URL) registered in Entra.
- Update the Reply URL in Entra to match exactly - including scheme (https://), full path, and no trailing slash.
AADSTS750057: Invalid SAML response or no SAML response
Cause: The Entity ID in the application does not match what is registered in Entra, or the SAML response is malformed.
Resolution:
- Confirm the SP Entity ID configured in the application exactly matches the Identifier (Entity ID) in Entra.
- Confirm the IdP Entity ID configured in the application matches the Entra ID Identifier shown in Section 4 of the Entra SAML page.
- These values are case-sensitive and must match character for character.
Assertion signature validation fails / Invalid signature
Cause: The X.509 certificate used for validation in the application does not match the current Entra signing certificate, or the certificate has expired.
Resolution:
- In the Enterprise Application SAML configuration > Certificates > check the expiry date of the active certificate.
- If expired or rotated, click New Certificate, make it active, and download the new Base64 certificate.
- Import the new certificate into the application's SAML configuration.
- Restart the application service if required.
Entra signing certificates expire every 3 years by default. Set a calendar reminder 60 days before expiry to plan a rotation window.
Single Logout (SLO) does not work - user remains signed in to Entra after signing out of the application
Cause: The SLO URL is not configured in either Entra or the application, or the binding types do not match.
Resolution:
- Confirm the Logout URL field in Entra's Basic SAML Configuration points to the application's SLO endpoint.
- Confirm the application's IdP SLO URL is set to the Logout URL shown in Entra Section 4.
- Entra uses HTTP Redirect binding for logout requests - confirm the application's SLO endpoint accepts GET/Redirect binding, not only POST.
User authenticates successfully in Entra but receives an error or no access in the application
Cause: The SAML assertion was accepted, but the user account was provisioned with no role or permissions in the application.
Resolution:
- Log in to the application as an administrator.
- Assign an appropriate role to the SSO-provisioned user account.
- To automate this for future users, configure a default role for SSO-registered accounts, or implement group-to-role mapping using the group claim configured in Step 6.
Attribute claims are empty or not recognised by the application
Cause: The attribute claim names sent by Entra do not match the names the application is expecting.
Resolution:
- In Entra → Enterprise Application > Attributes & Claims, note the full claim URI names being sent (e.g. http://schemas.xmlsoap.org/ws/2005/05/identity/claims/emailaddress).
- Cross-reference these with the application's expected attribute names from the vendor documentation.
- Either rename claims in Entra to match the application, or update the application's attribute mapping to match Entra's output.
- Use a SAML tracer browser extension or the application's debug mode to inspect the raw assertion during a test login.
Expected Outcome
|
Factor |
Detail |
|
Resolution Time |
45–90 minutes for initial configuration; additional time if attribute mapping requires investigation |
|
User Impact |
Zero - SAML SSO is additive; existing local accounts remain functional during migration |
|
Recurrence Risk |
Low - primary recurring issue is Entra signing certificate expiry (every 3 years by default) |
|
Ongoing Maintenance |
Rotate Entra signing certificate before expiry; manage user access via Enterprise Application assignments |
WebApp Authentication with Social IDPs (Google, Facebook & Apple ID)
|
Field |
Details |
|
Document Type |
Runbook / How-To Guide |
|
Applies To |
Microsoft Entra ID External Identities (CIAM), Social Identity Providers (Google, Facebook, Apple), Third-party Web Applications |
|
Audience |
Systems Administrators / Identity Engineers / 2nd Line Support |
|
AK. Udofeh |
|
|
Last Updated |
March 2026 |
Overview
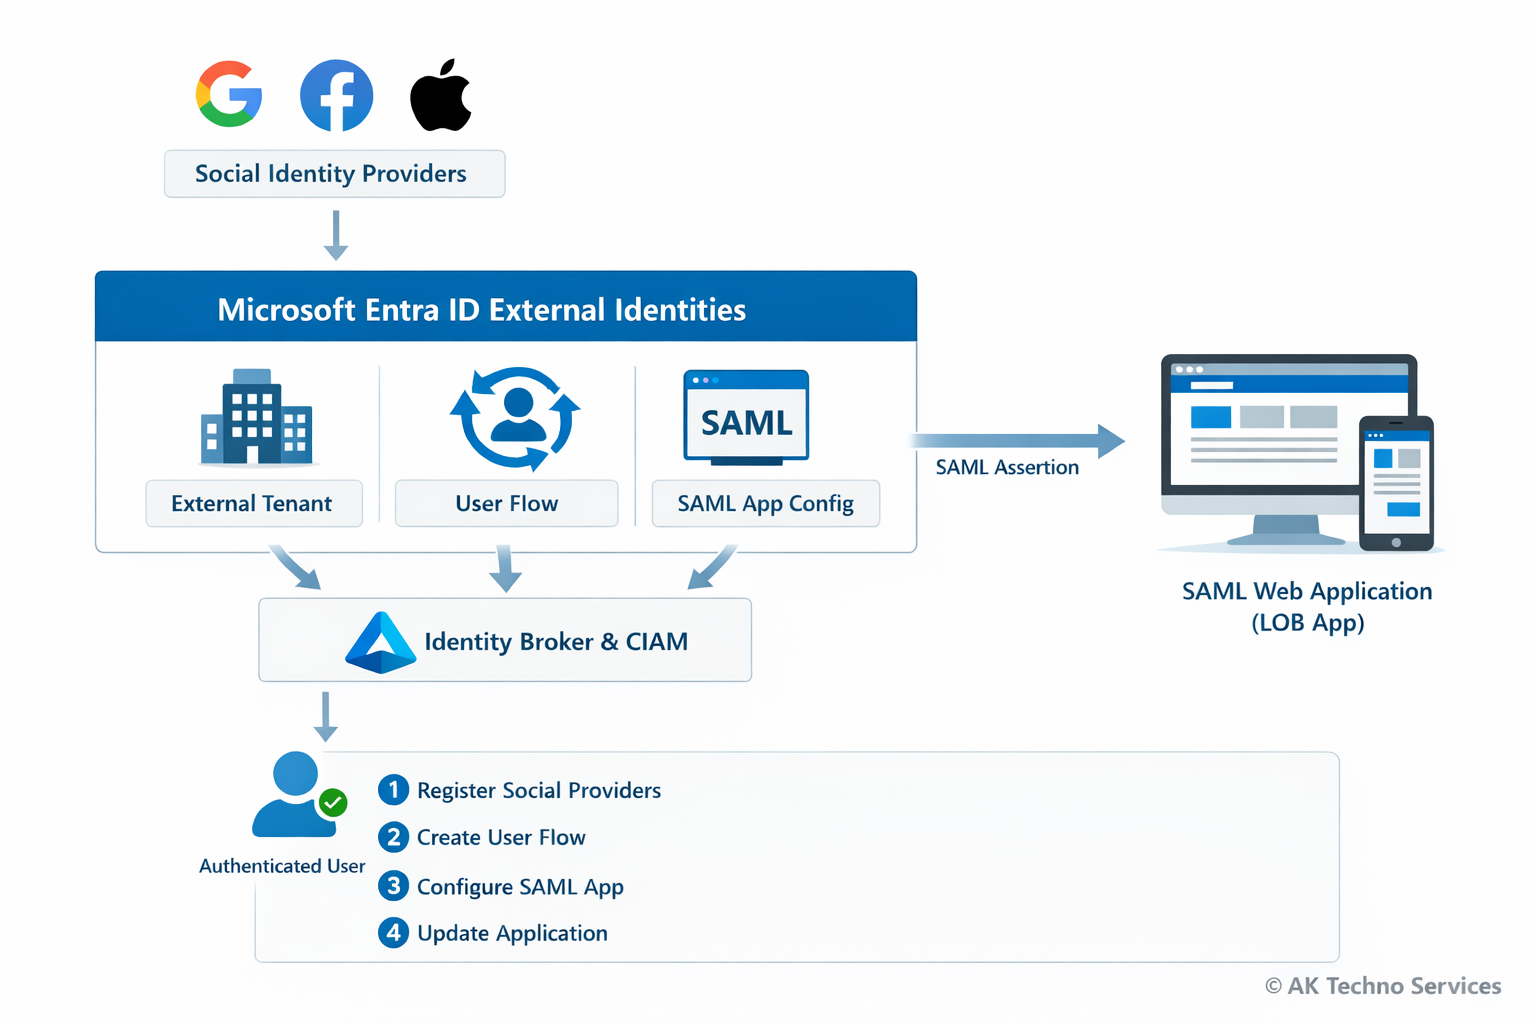
This guide documents how to integrate Social Identity Providers (Google, Facebook, and Apple) with a SAML-based web application for authentication using Microsoft Entra ID External Identities and Customer Identity & Access Management (CIAM). The configuration allows users to authenticate using social accounts while Microsoft Entra acts as the identity broker and issues a SAML assertion to the third-party or line-of-business (LOB) web application.
The process involves creating an external tenant, registering social identity providers, creating a user flow, configuring a SAML enterprise application, and updating the application configuration.
The Issue
Organisations often require users to authenticate using Social Identities (e.g. Google or Facebook) while maintaining a centralised identity broker for security and policy enforcement.
Without a configured identity broker:
-
Applications must integrate individually with each social provider.
-
Identity attributes are inconsistent between providers.
-
Access control and auditing become difficult to manage.
Basic authentication methods such as:
-
Local application accounts
-
Direct OAuth integration within the application
do not provide centralised identity management or federation capabilities.
Using Microsoft Entra External Identities resolves this by brokering authentication from social providers and issuing a standard SAML assertion to the application.
Context
Modern applications often require authentication from multiple identity providers while maintaining centralised access control.
Without a broker, the authentication flow typically looks like this:
User
  ↓
Application
  ↓
Direct OAuth with Google/Facebook
This causes several issues:
-
Applications must implement provider-specific authentication logic
-
Identity attributes differ between providers
-
Access control cannot be centrally enforced
Using Microsoft Entra External Identities introduces an identity broker layer:
User
  ↓
Google / Facebook / Apple
  ↓  (OAuth / OIDC)
Microsoft Entra External Tenant (CIAM)
  ↓  (User Flow)
Enterprise Application (SAML)
  ↓
Flask Web Application
In this architecture:
Before You Start
Check |
Where |
|---|---|
External tenant created |
Microsoft Entra admin centre |
Azure subscription linked |
Tenant creation wizard |
Google Developer Console account |
console.cloud.google.com |
Meta Developer account |
developers.facebook.com |
Apple Developer account (optional) |
developer.apple.com |
SAML web application deployed |
Flask service |
Service Provider metadata configured |
|
Implementation Steps (Per Environment)
Phase 1 - Create External Tenant
Step 1: Sign in to the Microsoft Entra admin centre:
https://entra.microsoft.com
Navigate to:
Microsoft Entra ID> Overview> Manage TenantsClick:
Create> ExternalEnter the tenant details:
-
Tenant Name: <Your tenant name>
-
Domain Name: <Your domain name>
-
Location: Europe or Africa
-
Subscription: Azure subscription
Click:
Review + Create> CreateProvisioning may take up to 30 minutes.
Switch to the new tenant:
Settings> Directories + Subscriptions> SwitchPhase 2 - Add Social Identity Providers
Navigate to:
External Identities
> All Identity Providers
Integrate with Google Identity Provider
Step 1: Configure Google OAuth
Visit: https://console.cloud.google.com/
In Google Cloud Console:
APIs & Services
> Credentials
> OAuth2 Client ID
Fill in the Name of the Webapp
Add the Authorized redirect URI:
https://<tenant-subdomain>.ciamlogin.com/<tenant-subdomain>.onmicrosoft.com/federation/oauth2Copy the following values and keep is save
> Client ID
> Client Secret
Step 2: Register Google as Idp in Entra ID
In Entra ID (Ext tenant directory) navigate to:
External Identities
> All Identity Providers
Enter:
Client ID
Client Secret
Click:
SaveIntegrate with Facebook Identity Provider
Step 1: Create Meta Developer App
Visit to:
https://developers.facebook.com
Select:
My Apps > Create AppChoose:
Authenticate and request data from users with Facebook LoginSelect platform:
WebAdd redirect URI:
https://<tenant-subdomain>.ciamlogin.com/<tenant-subdomain>.onmicrosoft.com/federation/oauth2In App Settings > Basic, copy:
App ID
App Secret
Add application domain:
<your domain here> (e.g: example.com)Without adding the domain, Facebook login will fail with: "Can't load URL — domain isn't included in the app's domains"
Switch the application to:
Live ModeStep 2: Register Facebook Idp in Entra ID
In Entra ID (Ext tenant directory) navigate to:
External Identities
> All Identity Providers
> + Facebook
Enter:
App ID
App Secret
Click:
SaveIntegrate with Apple Identity Provider
Prerequisite: ● An active Apple Developer Account (Paid membership).
Step 1: Configure Apple Developer Portal
Navigate to:
https://developer.apple.com
Create an App ID with:
Sign in with Apple enabledCreate a Services ID
Example:
com.example.samllabConfigure redirect URI:
https://<tenant-subdomain>.ciamlogin.com/<tenant-subdomain>.onmicrosoft.com/federation/oauth2Create Sign In with Apple Key
Download:
.p8 private keyRecord:
Key ID
Team ID
Step 2: Register Apple Idp in Entra ID
In Entra ID (Ext tenant directory) navigate to:
External Identities
> All Identity Providers
> + Apple
Configure:
Client ID: Your Apple services ID
Apple developer team ID: Your Apple Team ID here
Key ID: Your Apple Key ID here
Client Secret: Upload the .p8 key file here
Phase 3: Create a User Flow
In Entra ID (Ext tenant directory) navigate to:
External Identities
> User Flows
> + New User Flow
Configure:
Name: (e.g) PilotApp-Auth-via-Socials
Enable identity providers:
Email with Password
Google
Facebook
Select attributes:
Display Name
Email Address
Given Name
Surname
Click:
CreatePhase 4: Register the SAML Application in Entra ID Ext Tenant directory
Navigate to:
Enterprise Applications
> New Application
> Create Your Own Application
Name:
My PilotApp with Socials IdpSelect:
Integrate any other application you don't find in the gallery
Configure SAML
Navigate to:
Single Sign-On
> SAML
Configure:
Identifier (Entity ID)
https://mypilot-app.example.comReply URL (ACS)
https://mypilot-app.example.com/acsConfigure Attributes & Claims
Map attributes:
| Claim | Value |
|---|---|
| givenname | user.givenname |
| surname | user.surname |
| emailaddress | user.mail |
Obtain Federation Metadata
Download:
Federation Metadata XMLExtract:
IdP Entity ID
SSO URL
Signing Certificate
In Entra ID Ext Tenant Directory Link the Application to the User Flow
Navigate to:
External Identities
> User Flows
> saml_lab_signin
> Applications
Click: Add Application
Select: <The Enterprise App you want to integrate>
Phase 5: Update Third-party or LOB App that you want to integrate with Socials IDP
Replace workforce tenant values with the external tenant values.
# External Tenant Configuration

SAML_IDP_ENTITY_ID=https://<external-tenant-id>.ciamlogin.com/<external-tenant-id>/
SAML_IDP_SSO_URL=https://<tenant-name>.ciamlogin.com/<tenant-name>.onmicrosoft.com/saml2
SAML_IDP_X509CERT=<base64-certificate>
Save the configuration.
The application will now authenticate users through the External Tenant user flow.
--------------------------------- Troubleshooting -----------------------------------
Facebook - Domain Not Included in App Domains
Error:
Can't load URL
The domain of this URL isn't included in the app's domains
Resolution:
Add the application domain in:
Meta Developer Console
> App Settings
> Basic
> App Domains
Facebook - Invalid Scopes Email
Error:
Invalid Scopes: email
Resolution:
Add the permission:
Permissions and Features
> email
Google - Redirect URI Mismatch
Error:
redirect_uri_mismatch
Resolution:
Ensure the redirect URI in Google Console matches:
https://.ciamlogin.com/.onmicrosoft.com/oauth2/authresp
SAML Login Failure
Error:
AADSTS75011 Authentication method mismatch
Resolution:
Disable strict authentication context in the Service Provider configuration.
Metric |
Result |
|---|---|
Resolution Time |
~45–90 minutes |
User Impact |
Users can authenticate using social providers |
Authentication Method |
Google, Facebook, Apple, or local account |
Recurrence Risk |
Low once identity providers are configured |
Entra ID Self-Service Password Reset (SSPR) Implementation
|
Field |
Details |
|
Document Type |
How-To Guide: Enterprise Implementation Runbook |
|
Applies To |
Microsoft Entra ID, Microsoft Entra Connect Sync, Microsoft 365 |
|
Audience |
Identity Engineers / Entra ID Administrators / Systems Administrators |
| Author |
AK. Udofeh |
|
Last Updated |
March 2026 |
Overview
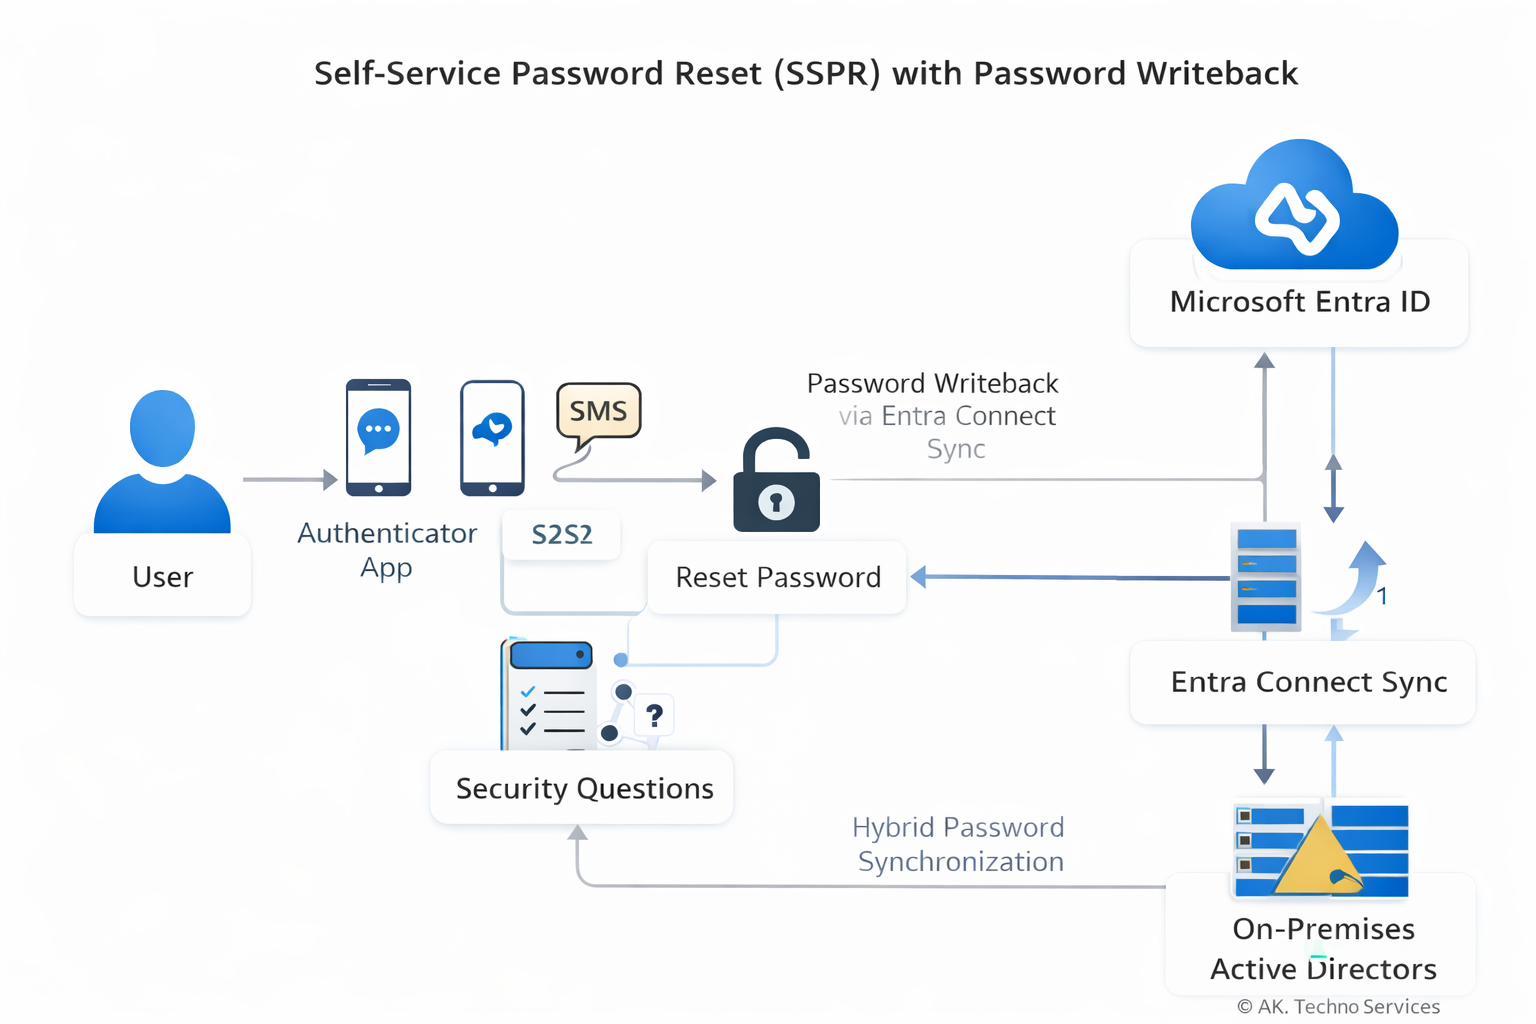
This document provides a complete runbook for implementing Self-Service Password Reset (SSPR) in Microsoft Entra ID within an enterprise environment using Entra Connect Sync with Password Writeback. The guide walks through prerequisites, configuration steps, authentication method setup, hybrid password writeback, monitoring, and troubleshooting.
The configuration enables users and administrators to reset their own passwords securely using Microsoft Authenticator, SMS, and Security Questions, with passwords written back to on-premises Active Directory.
The Issue
In organisations without Self-Service Password Reset enabled:
-
Users must contact the Service Desk to reset forgotten passwords.
-
Password resets generate high ticket volume.
-
Account lockouts reduce productivity.
-
Password resets outside support hours may delay business operations.
Common symptoms in such environments include:
-
Frequent password reset tickets.
-
Users locked out of Microsoft 365 services.
-
Helpdesk manually resetting passwords in Active Directory Users and Computers (ADUC).
Basic remediation steps such as:
-
Clearing browser cache
-
Waiting for lockout timers
-
Logging into another device
do not resolve the underlying issue, because the problem is structural: users lack a secure self-service mechanism.
Context
The root cause is the absence of Self-Service Password Reset capability integrated with the organisation’s identity infrastructure.
In hybrid identity environments, password changes must occur across two identity planes:
User → Entra ID Authentication
       ↓
SSPR Validation (Authenticator / SMS / Questions)
       ↓
Entra ID Password Reset Engine
       ↓
Password Writeback via Entra Connect
       ↓
On-Prem Active Directory Password Update
       ↓
Password Sync Back to Entra ID
Normal Process (with SSPR)
-
User initiates password reset.
-
Entra ID verifies identity using configured authentication methods.
-
Password reset is approved.
-
Password writeback sends the new password to on-prem AD.
-
Entra Connect synchronises the updated password hash.
What Breaks Without SSPR
-
Users cannot reset passwords independently.
-
Password resets must be performed by administrators.
-
Hybrid environments create delays due to manual intervention.
Known Triggers for Password Reset Demand
-
Password expiry policies.
-
Account lockout thresholds.
-
New device sign-ins triggering authentication.
-
VPN credential usage.
-
Conditional Access enforcing re-authentication.
Before You Start
| Check | Where |
|---|---|
| Entra ID P1 or P2 licenses assigned | Microsoft 365 Admin Center |
| Microsoft Entra Connect Sync installed | On-prem identity server |
| Password Writeback feature enabled | Entra Connect configuration |
| Hybrid identity synchronisation healthy | Entra Connect Health |
| Security group created for SSPR pilot scope | Entra ID → Groups |
| Users registered for authentication methods | Security Info portal |
| Required firewall ports open | Identity infrastructure |
Implementation steps
Step 1: Create the SSPR Security Group
1. Open the Microsoft Entra Admin Center
https://entra.microsoft.comIdentity > Groups3. Select New Group
Configuration:
| Setting | Value |
|---|---|
| Group Type | Security |
| Name | SSPR-Enabled-Users |
| Membership | Assigned |
4. Add users who should have SSPR enabled.
This group will be used to scope the SSPR policy.
Step 2: Enable Self-Service Password Reset
Entra ID > Password Reset| Setting | Value |
|---|---|
| Self Service Password Reset Enabled | Selected |
| Selected Group | SSPR-Enabled-Users |
Save the configuration.
Step 3: Configure Authentication Methods
Entra ID > Authentication Methods| Method | Enabled |
|---|---|
| Microsoft Authenticator | Enabled |
| SMS | Enabled |
| Email OTP | Enabled |
Choose and enable all required Auth methods and add the Entra ID group with the SSPR-Enabled-Users group to the policy.
Entra ID > Password Reset > Authentication Methods| Setting | Value |
|---|---|
| Number of methods required | 1 |
Choose the desired number of authentication methods required to reset a password and save.
Step 4: Enable Password Writeback
Open the Microsoft Entra Connect Windows Server.
Launch:
Azure AD ConnectSelect:
Configure → Customize synchronization optionsDuring configuration:
Enable:
Password writeback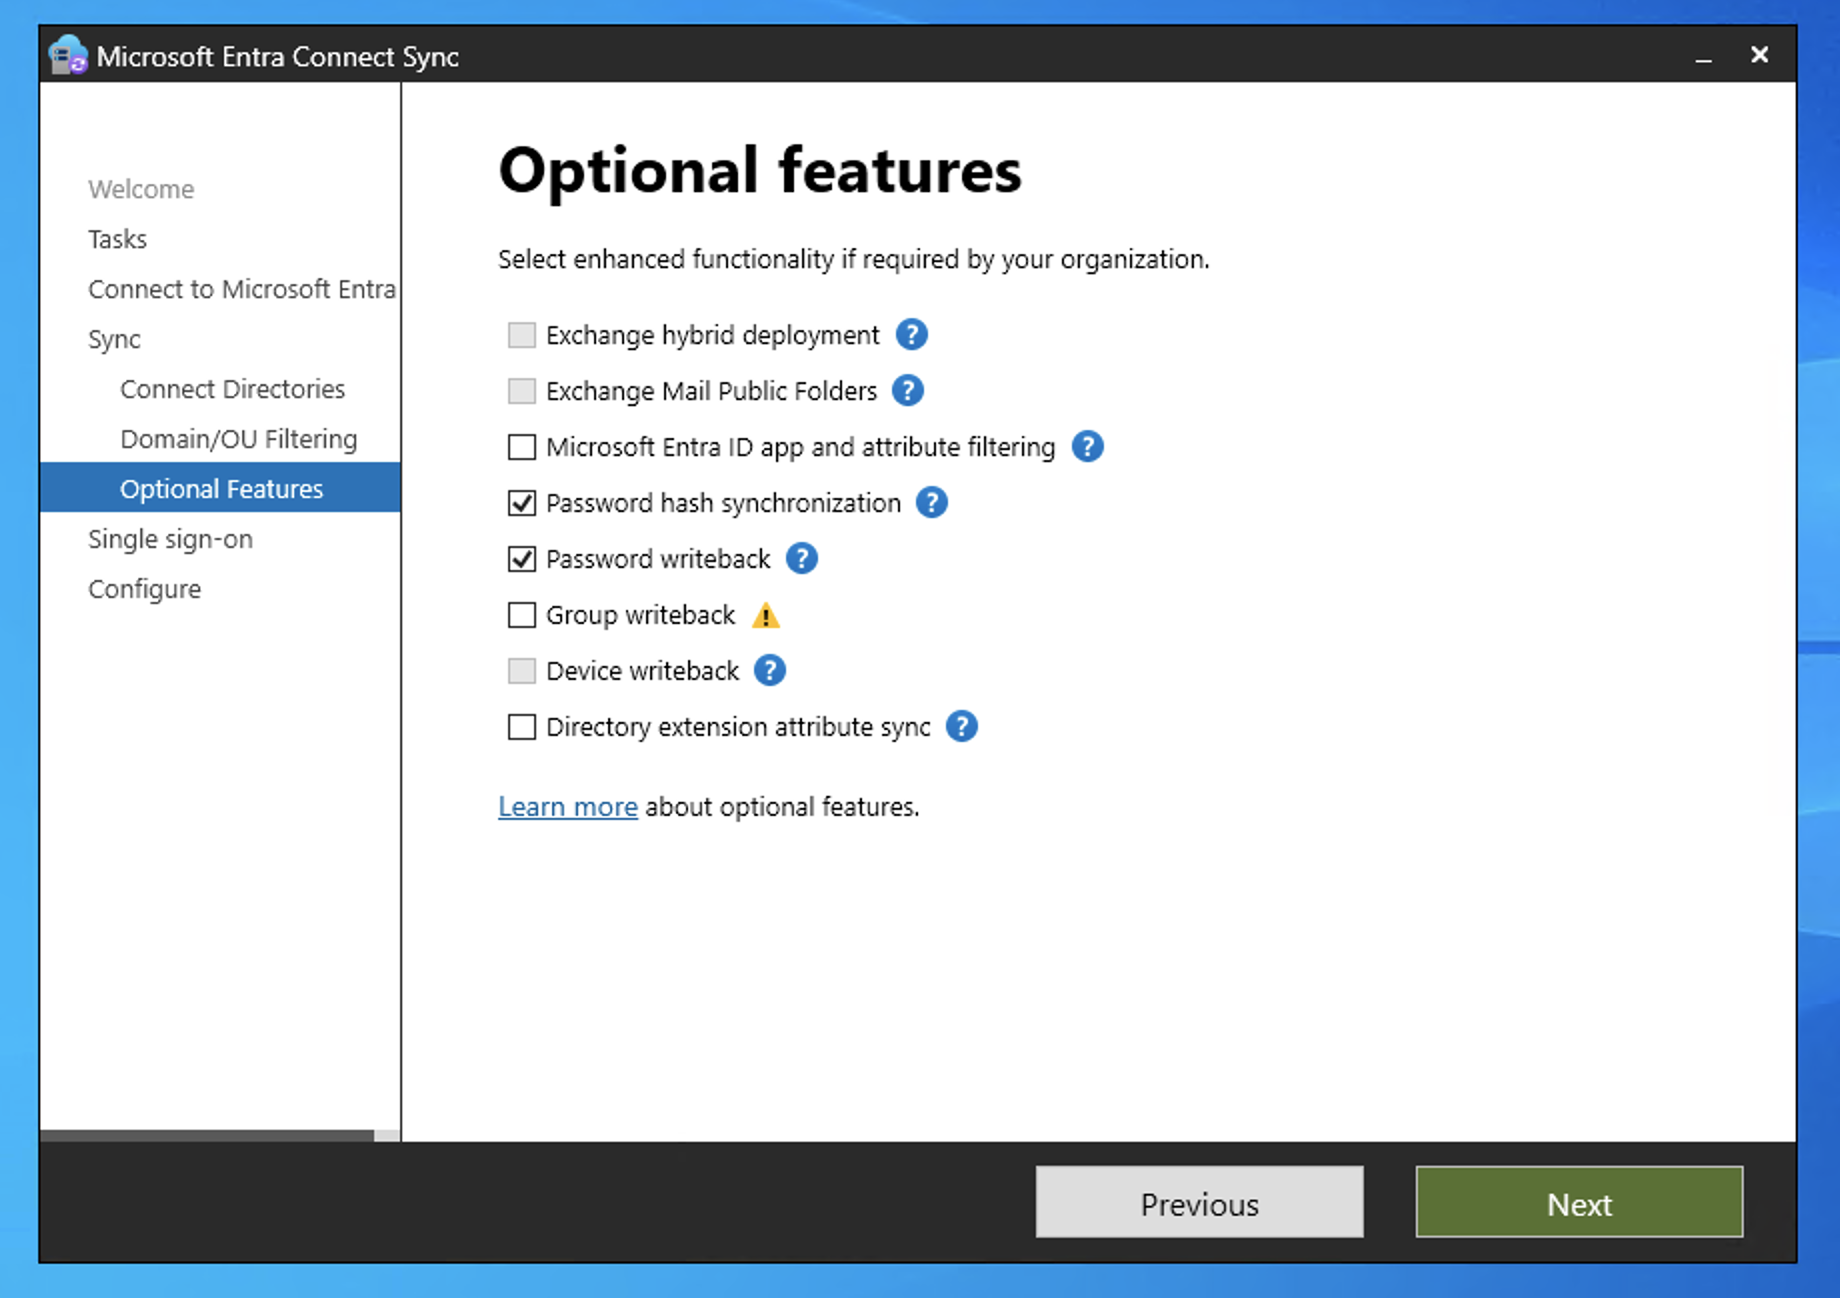
Complete the configuration wizard.
Verify status in:
Entra Admin Center
Identity → Hybrid Management → Entra Connect
Password writeback must show Enabled.
Step 5: Enable Administrator SSPR
Entra ID > Password Reset > Administration PolicyAdministrators require stricter security.
Recommended configuration:
| Setting | Value |
|---|---|
| Number of authentication methods required | 2 |
| Allowed methods | Authenticator, SMS |
Security questions are not recommended for administrators.
Step 6: Verify Combined Security Information Registration
Combined registration allows users to configure MFA and Self-Service Password Reset authentication methods in a single workflow.
Entra ID > Authentication Methods > SettingsVerify the tenant is using the modern Authentication Methods policy framework.
If the Combined registration toggle is not visible, the feature is already enabled by Microsoft and no further configuration is required.
User registration portal:
https://aka.ms/mysecurityinfoUsers will register the following methods during onboarding:
-
Microsoft Authenticator
-
SMS verification
-
Security questions (if enabled in SSPR policy)
This portal supports both MFA and SSPR authentication method registration.
Step 7: Configure User Notification Settings
Password Reset > NotificationsRecommended configuration:
| Setting | Value |
|---|---|
| Notify users on password reset | Enabled |
| Notify admins on admin password reset | Enabled |
==================================== Monitoring and Reporting ==============================
Entra Audit Logs
Entra Admin Center
Password reset > Audit Logs
Filter for:
Activity: Self-service password resetEvents recorded:
-
Password reset initiated
-
Password reset completed
-
Password writeback success/failure
Sign-In Logs
Password reset > Audit LogsReview authentication challenges and method usage.
SSPR Usage Reports
Entra ID > Password Reset > Usage & InsightsMetrics include:
| Metric | Description |
|---|---|
| Password resets | Total resets performed |
| Registrations | Users who registered authentication methods |
| Success rate | Successful resets vs attempts |
These reports help measure adoption and identify issues.
============================Troubleshooting=====================
Password Writeback Failed
Error example:
Password reset failed to write back to on-premises directoryPossible causes:
-
Entra Connect not running
-
Password writeback disabled
-
Domain controller connectivity issues
Resolution:
-
Verify Entra Connect service status.
-
Confirm writeback is enabled.
-
Check Event Viewer - Application Logs on the Entra Connect server.
User Not Allowed to Reset Password
Possible cause:
User not included in the SSPR security group.
Resolution:
-
Add the user to the SSPR group.
-
Wait for directory replication.
User Not Registered for Authentication
Error example:
You need to register for password resetResolution:
Direct the user to:
https://aka.ms/mysecurityinfo
https://aka.ms/mysecurityinfoComplete registration before attempting password reset.
Administrator Reset Fails
Possible cause:
Administrator policy requires stronger authentication.
Resolution:
Ensure the administrator has registered:
-
Microsoft Authenticator
-
SMS
Expected Outcome
| Metric | Result |
|---|---|
| Resolution Time | Immediate user password reset |
| User Impact | Reduced helpdesk dependency |
| Recurrence Risk | Low once authentication registration is completed |
SAML Transformation Fallback Workaround (Microsoft Entra ID)
|
Field |
Details |
|
Document Type |
How-To Guide - SSO SAML Transformation Runbook |
|
Applies To |
Microsoft Entra ID, 3rd-Party WebApps & Single-name user accounts |
|
Audience |
2nd Line / Entra ID Admins / IT Engineer |
|
Author |
AK. Udofeh |
|
Last Updated |
Jan 2026 |
Overview
This document describes a targeted workaround implemented within Microsoft Entra ID to address a SAML single sign-on (SSO) integration limitation with 3rd-Party or InHouse LOB WebApp, where the service provider requires the givenName (first name) attribute to be present during authentication.
The workaround enables successful authentication for users who have a single name recorded in Entra ID (i.e. no givenName or surname attribute populated), without modifying directory data.
Background
During an investigation of a user login issue raised by a 3rd-Party Service Provider support team, it was identified that:
-
The WebApp requires all user accounts to have both givenName and surName attributes to be populated in Entra ID.
-
Microsoft Entra ID successfully completes SAML authentication even when givenName is empty.
-
The WebApp enforces givenName as a mandatory SAML attribute and rejects authentication if it is missing.
This behaviour is Service Provider side and outside of Entra ID control. However, a controlled, application-scoped workaround is possible using SAML claim transformations.
Design Principles
The workaround was designed with the following principles in mind:
-
Application-scoped only – no tenant-wide or directory-wide impact
-
Non-destructive – no changes to user objects or identity source data
-
Least privilege / minimal impact – only activates when givenName is empty
-
Reversible – easy to remove if Service Provider configuration changes
Technical Summary
The SAML givenName claim for the WebApp Enterprise Application is configured using a conditional transformation:
-
If user.givenName is populated > send user.givenName
-
If user.givenName is empty > fall back to user.displayName
This ensures that the WebApp always receives a non-null givenName value, allowing authentication to complete successfully.
No other SAML claims are affected.
Implementation Details
Microsoft Entra ID > Enterprise Applications > WebApp > Single sign-on >Attributes & Claims
Claim:
-
Name: givenname
-
Namespace: Default
Transformation Logic:
-
IfNotEmpty(user.surname) > output user.surname
-
IfEmpty(previous output) > output user.givenname
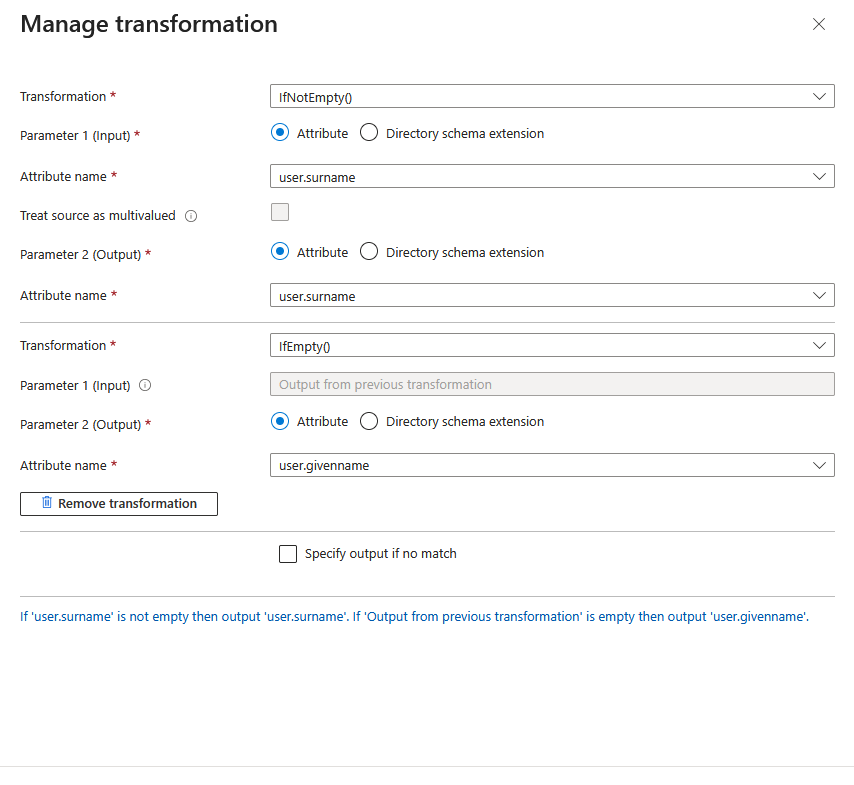
This transformation is evaluated at authentication time and does not write back to Entra ID.
Impact Assessment
Who is affected:
-
Only users authenticating to WebApp via SAML
-
Only users whose givenName attribute is empty
What changes:
-
WebApp receives a synthetic givenName value for single-name users
What does NOT change:
-
Entra ID user attributes
-
Other enterprise applications
-
Authentication behaviour for users with a populated givenName
Risks and Considerations
-
The givenName value provided to the WebApp may not represent a true first name.
-
If the WebApp stores or reuses the attribute internally, the fallback value may persist within their system.
-
This workaround compensates for a Service Provider SAML attribute mandatory requirement and should be reviewed if Service Provider updates its SAML requirements.
This implementation should not be used as a general pattern unless explicitly required.
Configuring Phishing‑Resistant MFA (PR‑MFA) in Entra ID Conditional Access
|
Field |
Details |
|
Document Type |
How-To Guide - Configure Phishing‑Resistant MFA (PR‑MFA) |
|
Applies To |
Microsoft Entra ID, Conditional Access policy |
|
Audience |
2nd Line / Entra ID Admins / IT Engineer |
|
Author |
AK. Udofeh |
|
Last Updated |
March 2026 |
Overview
Phishing‑Resistant MFA (PR‑MFA) is the strongest authentication assurance level available in Microsoft Entra ID. It requires cryptographically bound authentication methods such as FIDO2 security keys, device‑bound passkeys, or Windows Hello for Business.
Microsoft formally introduced Phishing‑resistant MFA Authentication Strength as part of Conditional Access by 2025. This prevents attackers from bypassing MFA via techniques like real‑time phishing proxies, MFA fatigue, push spam, or OTP interception.
Use Cases
Use PR‑MFA for:
- Administrators and privileged roles (Global Admin, Security Admin, Conditional Access Admin)
- Users accessing high‑value or regulated workloads
- Teams handling sensitive data: finance, HR, legal
- Zero‑Trust access strategies requiring high authentication assurance
Prerequisites
Licensing
- Microsoft Entra ID P1/P2 (Authentication Strengths supported).
Technical Requirements
- Supported phishing‑resistant methods enabled (FIDO2, Windows Hello, Passkeys).
- Users must have registered a phishing‑resistant method before enforcement to avoid lockouts
Supported Authenticators
- FIDO2 security keys (hardware)
- Windows Hello for Business
- Device‑bound passkeys (Windows/macOS/iOS/Android, depending on platform)
Do not enforce PR‑MFA without ensuring users have registered the required method. Risk of tenant lockout. Break‑glass (emergency access) accounts must be excluded. Legacy apps that do not support modern authentication may require exceptions or re‑architecture.
Step‑by‑Step Configuration
Step 1: Enable Phishing‑Resistant Authentication Methods
- Go to Entra Admin Center > Identity > Protection > Authentication Methods.
- Enable: Passkeys (FIDO2) and Windows Hello for Business
Step 2: Create a Security Group for Pilot Users
- Create a group like PR‑MFA‑Pilot.
- Add admin users or a testing cohort.
Step 3: Configure Authentication Strength
- Go to Identity > Protection > Conditional Access > Authentication Strengths.
- Select Phishing‑resistant MFA strength.
This explicitly enforces device‑bound cryptographic methods.
Step 4: Create the PR‑MFA Conditional Access Policy
- Go to Conditional Access > Policies > + New Policy.
- Name: Require Phishing‑Resistant MFA
- Assignments:
- Users: select PR‑MFA‑Pilot group
- Cloud apps: All cloud apps (recommended for admins)
- Access Controls > Grant > Require Authentication Strength
- Select Phishing‑resistant MFA
- Enable policy = Report‑only (first phase).
- After validation, switch to ON.
Validation Steps
- Validate sign‑in logs to confirm Phishing‑Resistant MFA was the effective control.
Entra Admin Center > Monitoring & Logs > Sign‑in logs. - Test phishing‑resistant methods:
- FIDO2 key
- Windows Hello
- Device‑bound passkey
These should satisfy the authentication requirement if configured correctly.
====================== Troubleshooting =========================
| Issue | Resolution |
|---|---|
| Users locked out | Confirm registration at https://aka.ms/mysecurityinfo and exclude user temporarily |
| FIDO2 key not accepted | Ensure attestation not restricted & key model supported |
| Windows Hello not offered | Check if device is Entra‑joined/registered |
| App can't satisfy PR‑MFA | App may be legacy / does not support modern auth |
Enabling Token Protection in Entra ID Conditional Access
|
Field |
Details |
|
Document Type |
How-To Guide - Enable Token Protection in Entra ID Conditional Access |
|
Applies To |
Microsoft Entra ID, Conditional Access policy |
|
Audience |
2nd Line / Entra ID Admins / IT Engineer |
|
Author |
AK. Udofeh |
|
Last Updated |
March 2026 |
Overview
Token Protection is a Conditional Access session control that cryptographically binds authentication tokens (e.g., Primary Refresh Tokens) to a specific device. This prevents token replay, pass‑the‑cookie attacks, and AiTM token theft. It ensures that even if an attacker steals a token, they cannot use it on another machine.
Use Cases
Use Token Protection when:
- Protecting Exchange Online, SharePoint Online, Teams, and Microsoft 365 native applications.
- Hardening admin or power‑user endpoints
- Preventing AiTM attacks that harvest tokens after MFA completion
- Enforcing Zero‑Trust principles
Prerequisites
Licensing - Microsoft Entra ID P1 is required for Token Protection.
Device Requirements
Supported Platforms (per Microsoft):
| Platform | Support Level | Requirements |
|---|---|---|
| Windows 10+ | GA | Entra‑joined, Hybrid‑joined, or Entra‑registered devices |
| macOS 14+ | Preview | Must be MDM‑managed + Enterprise SSO plug‑in |
| iOS/iPadOS 16+ | Preview | Must be MDM‑managed + Enterprise SSO plug‑in |
| Android | ❌ Not Supported | - |
Application Requirements
Token Protection currently supports:
- Exchange Online
- SharePoint Online
- Microsoft Teams
- Supported Microsoft 365 native clients (Outlook, OneDrive, Teams)
Browser‑based sessions NOT supported (only native apps). Deploy in Report‑only mode first to prevent app/device disruption. MDM is required for macOS/iOS preview support.
Step‑by‑Step Configuration
Step 1: Validate Device Registration
Devices must be:
- Entra‑joined
- Hybrid‑joined
- Entra‑registered
This ensures PRT issuance.
Step 2: Create a Pilot Group
Create group: TokenProtection‑Pilot.
Step 3: Create Token Protection Conditional Access Policy
- Go to Entra Admin Center > Entra ID > Conditional Access
- Click + New Policy.
- Name it Enable Token Protection (Pilot).
- Assign:
- Users: Choose a Pilot Security Group
- Cloud Apps: Office 365 Exchange Online, Office 365 SharePoint Online, Microsoft Teams Services
- Cloud Apps: Office 365 Exchange Online, Office 365 SharePoint Online, Microsoft Teams Services
- Users: Choose a Pilot Security Group
The Conditional Access policy should only be configured for these applications. Selecting the Office 365 application group might result in unintended failures. This change is an exception to the general rule that the Office 365 application group should be selected in a Conditional Access policy. - According to Microsoft Learn.
- Conditions > Device Platform > Set Configure to Yes > Include: Windows
- Select Done
- Under Client apps > Set Configure to Yes
Not configuring the Client Apps condition, or leaving Browser selected might cause applications that use MSAL.js, such as Teams Web to be blocked.
- Under Modern authentication clients, only select Mobile apps and desktop clients. Leave other items unchecked.
- Select Done
- Access Controls > Session > Enable Token Protection
- Set Require token protection for sign-ins.
- Enable policy in Report‑only mode.
Step 4: Move to Full Enforcement
After reviewing logs:
- Set policy to ON
- Gradually expand target groups
Validation Steps
Capture logs and analyze
Monitor Conditional Access enforcement of token protection before and after enforcement by using features like Policy impact, Sign-in logs, and Log Analytics.
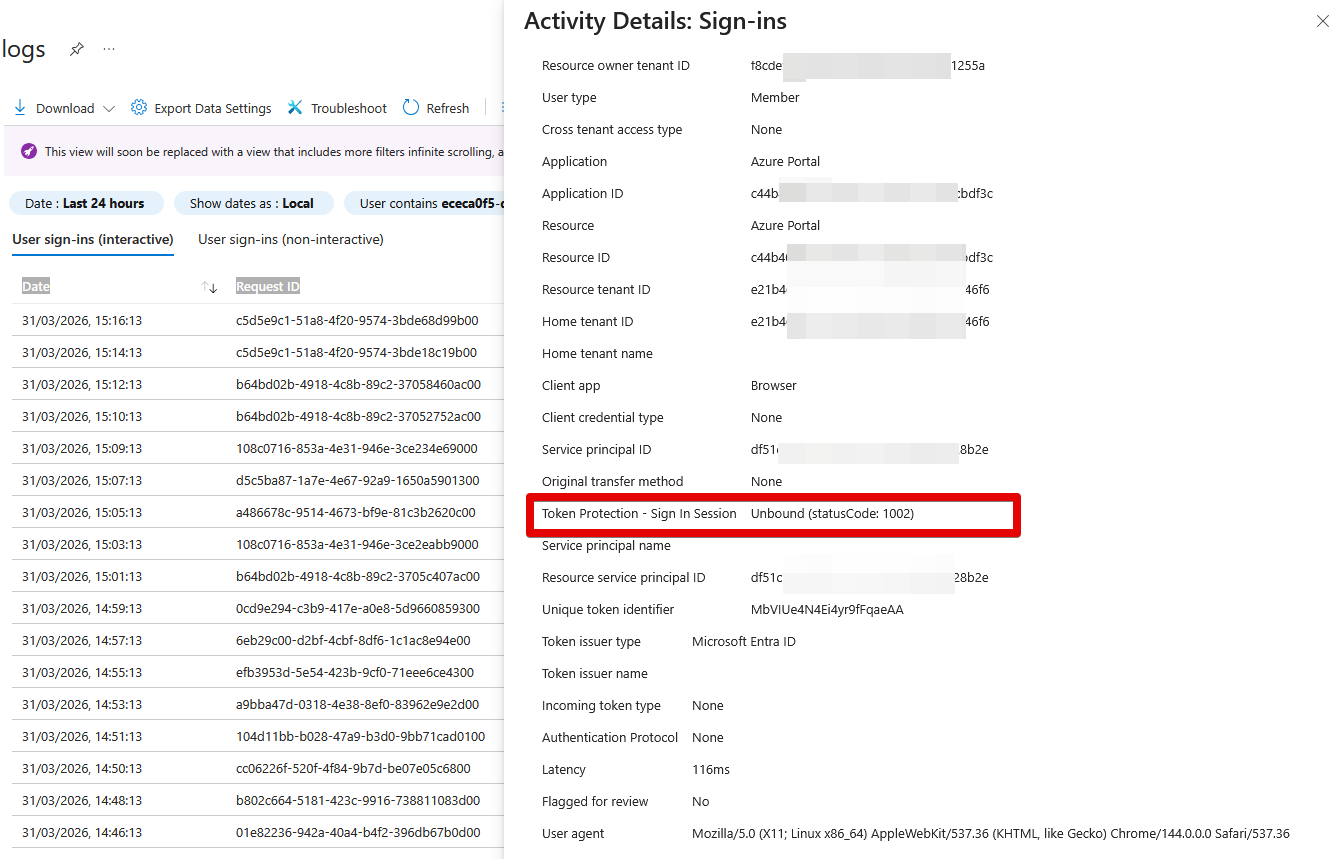
Sign-in logs
Use Microsoft Entra sign-in log to verify the outcome of a token protection enforcement policy in report only mode or in enabled mode.
- Sign in to the Microsoft Entra admin center as at least a Conditional Access Administrator.
- Browse to Entra ID > Monitoring & health > Sign-in logs.
- Select a specific request to determine if the policy is applied or not.
- Go to the Conditional Access or Report-Only pane depending on its state and select the name of your policy requiring token protection.
- Under Session Controls check to see if the policy requirements were satisfied or not.
- To find more details about the binding state of the request, select the pane Basic Info and see the field Token Protection - Sign In Session. Possible values are:
- Bound: the request was using bound protocols. Some sign-ins might include multiple requests, and all requests must be bound to satisfy the token protection policy. Even if an individual request appears to be bound, it doesn't ensure compliance with the policy if other requests are unbound. To see all requests for a sign-in, you can filter all requests for a specific user or look by correlation ID.
- Unbound: the request wasn't using bound protocols. Possible
statusCodeswhen request is unbound are:- 1002: The request is unbound due to the lack of Microsoft Entra ID device state.
- 1003: The request is unbound because the Microsoft Entra ID device state doesn't satisfy Conditional Access policy requirements for token protection. This error could be due to an unsupported device registration type, or the device wasn't registered using fresh sign-in credentials.
- 1005: The request is unbound for other unspecified reasons.
- 1006: The request is unbound because the OS version is unsupported.
- 1008: The request is unbound because the client isn't integrated with the platform broker, such as Windows Account Manager (WAM).
======================== Troubleshooting =======================
| Issue | Cause | Solution |
|---|---|---|
| User blocked from Outlook/Teams | Device not registered / not supported | Verify Entra join/registration status |
| macOS/iOS failing | Not MDM‑managed | Enforce MDM requirement for preview support |
| Browser apps unaffected | Browsers not supported | Use native apps or combine with CA blocking controls |
| Token still reusable | App not in supported list | Only Teams/SharePoint/Exchange supported currently |
Passwordless MFA Method Registration in Entra ID
|
Field |
Details |
|
Document Type |
How-To Guide / Runbook |
|
Applies To |
Microsoft Entra ID, Microsoft 365, Windows 10/11, Web sign-ins |
|
Audience |
Entra ID / Microsoft 365 Administrators (2nd Line / Systems Admin) |
|
Author |
AK. Udofeh |
|
Last Updated |
March 2026 |
Overview
This document explains how to enable and configure passwordless authentication methods (Microsoft Authenticator phone sign-in, FIDO2 / Passkey security keys, and Windows Hello for Business) in Microsoft Entra ID, and how admins should guide users to register them. It is intended for Entra ID administrators responsible for identity security, MFA, and Conditional Access in Microsoft 365 environments.
Background
-
Users currently authenticate primarily with passwords and traditional MFA (SMS/voice/OTP), which are weak against phishing, replay, and credential stuffing attacks.
-
Standard self-service MFA registration does not guarantee that users will enrol in passwordless methods unless those methods are explicitly enabled and promoted by administrators.
-
Regulatory or internal security policies may require stronger, phishing-resistant or passwordless authentication for privileged roles, high-value apps, or all users over time.
Basic steps that do not resolve the issue on their own:
-
Enabling MFA “per user” without configuring modern authentication methods policy.
-
Relying on SMS / voice codes alone, which remain phishable and weaker than passwordless methods.
-
Asking users to “use the Authenticator app” without enabling phone sign-in or FIDO2 / Passkey in the Authentication methods policy.
Other affected services/systems:
-
Microsoft 365 workloads (Exchange Online, SharePoint Online, Teams, Entra admin center, Azure portal, etc.) rely on Entra ID sign-in and benefit directly from passwordless configuration.
Current setup
-
By default, Entra ID tenants may only have legacy MFA methods widely used (phone call, SMS, app OTP) and password-based sign-in, while modern passwordless options are disabled or scoped to no users.
-
This leaves accounts exposed to phishing and password-based attacks and prevents admins from enforcing phishing-resistant authentication strengths in Conditional Access.
Desired End state
-
Admin enables passwordless authentication methods in Entra admin center > Protection > Authentication methods and targets appropriate groups.
-
Users register Microsoft Authenticator phone sign-in, FIDO2 / Passkey security keys, or Windows Hello for Business via My Sign-ins or Windows enrolment flows.
-
Conditional Access and authentication strengths can then require passwordless / phishing-resistant MFA for specific users and apps.
What currently missing:
-
Passwordless methods are not enabled or targeted correctly, so users cannot register them, Conditional Access cannot require them reliably, and the organisation remains password-dependent.
Known triggers:
-
New tenant where no Authentication methods policy is configured.
-
Tenants migrated from legacy per-user MFA, where admins never moved to a unified authentication methods policy.
-
Hybrid or legacy Windows devices are not meeting Windows Hello for Business prerequisites.
Before You Start
Use this checklist before enabling passwordless methods.
Implementation Steps
1. Enable Microsoft Authenticator Passwordless Sign-in
- Sign in to https://entra.microsoft.com with an account that has Authentication Policy Administrator or Global Administrator role.
- Go to Entra ID > Authentication methods > Policies.
- Select Microsoft Authenticator from the list of built-in methods.
- Set Enable to On.
- Under Target, select All users or a dedicated pilot group (recommended initially).
Be sure that at least two admins are in the pilot group.
6. Confirm Authentication mode includes Passwordless sign-in (phone sign-in) as allowed.
7 Click Save.
2. Enable FIDO2 / Passkey Security Keys
-
In Authentication methods > Policies, select Passkey (FIDO2) (may appear as FIDO2 security key in some portals).
-
Set Enable to On.
-
Under Target, select a pilot group or All users depending on readiness.
Start with a small group if you have never deployed keys before.
4. Open the Configure tab and ensure Allow self-service setup is enabled so users can register keys at
https://mysignins.microsoft.com/security-info
5. (Optional but recommended) In the same Configure tab:
-
-
Enable Enforce attestation in production so only trusted hardware keys from approved manufacturers can be registered.
-
Configure Key restriction policy with allowed AAGUIDs if you want to restrict to specific key models.
-
6. Click Save.
3. Configure Windows Hello for Business (if required)
-
Confirm devices run Windows 10 version 1809+ or Windows 11 and are Entra-joined or hybrid-joined as per your design.
-
Configure Windows Hello for Business via Intune device configuration or Group Policy according to Microsoft guidance (PIN and biometrics on devices with TPM).
-
Ensure Windows Hello for Business is enabled as an authentication method in Authentication methods > Policies and targeted to groups/devices that meet prerequisites.
-
For hybrid environments requiring on-prem sign-in with FIDO2, ensure you also follow passwordless security key sign-in to on-premises resources guidance.
4. Instruct Users to Register Passwordless Methods
-
Ask users in the pilot group to sign in to https://mysignins.microsoft.com/security-info
-
For Microsoft Authenticator phone sign-in:
-
Install the Microsoft Authenticator app on iOS/Android.
-
Add the work/school account and enable phone sign-in when prompted in the app.
-
-
For FIDO2 / Passkey security keys:
-
Users open Security info > Add sign-in method.
-
Choose Security key and follow browser prompts to register the FIDO2 key (USB/NFC/Bluetooth).
-
-
For Windows Hello for Business:
-
During Windows out-of-box experience or after sign-in, users will be prompted or can go to Settings > Accounts > Sign-in options to configure PIN and biometric sign-in.
-
-
Confirm that at least two passwordless-capable methods are configured for each admin account where possible.
5. Validate Sign-in Behaviour
-
In a test browser, go to https://portal.office.com or https://portal.azure.com and initiate sign-in as a pilot user.
-
Verify that passwordless options (Authenticator notification number match, security key, or Windows Hello) are available and functioning.
-
Check Entra admin centre > Protection > Authentication methods > Activity or sign-in logs to confirm passwordless usage.
Automated / Script Option (PowerShell for Policy Creation – Example for FIDO2)
This is an example script using Microsoft Graph PowerShell to enable FIDO2 (Passkey) for all users; adjust scoping for production.
# Connect to Microsoft Graph with appropriate scopesConnect-MgGraph -Scopes "Policy.Read.All","Policy.ReadWrite.AuthenticationMethod"# Get existing FIDO2 authentication method policy$fidoPolicy = Get-MgPolicyAuthenticationMethodPolicyAuthenticationMethodConfiguration ` -Filter "id eq 'Fido2'"# If the policy does not exist, throw an errorif (-not $fidoPolicy) { throw "FIDO2 authentication method policy not found."}# Enable the FIDO2 policy and target all users$updateBody = @{ state = "enabled" # Turn the method on includeTargets = @( @{ id = "all_users" # Target all users (adjust for groups if needed) targetType = "group" # TargetType can be group or user isRegistrationRequired = $true # Require registration } )}# Update the FIDO2 policyUpdate-MgPolicyAuthenticationMethodPolicyAuthenticationMethodConfiguration ` -AuthenticationMethodConfigurationId $fidoPolicy.Id ` -BodyParameter $updateBody# Output the updated policy to confirm changesGet-MgPolicyAuthenticationMethodPolicyAuthenticationMethodConfiguration ` -AuthenticationMethodConfigurationId $fidoPolicy.Id-
Run from an admin workstation or Cloud Shell as a Global Administrator / Authentication Policy Administrator.
-
Requires Microsoft Graph PowerShell SDK and appropriate API permissions (delegated or app).
Expected output / success indicators:
-
Final
Get-MgPolicyAuthenticationMethodPolicyAuthenticationMethodConfigurationoutput showsstateasenabledandincludeTargetsscoped as configured.
Script Breakdown
-
Connect-MgGraph -Scopes ...connects to Microsoft Graph with permissions to read and update authentication method policies. -
Get-MgPolicyAuthenticationMethodPolicyAuthenticationMethodConfigurationretrieves the current FIDO2 authentication method configuration by ID (Fido2). -
The
if (-not $fidoPolicy)block ensures the script fails fast if the FIDO2 configuration is not present. -
$updateBodydefines the new policy state and targeting, setting the method to enabled and targetingall_users(which you may replace with a specific group object ID). -
Update-MgPolicyAuthenticationMethodPolicyAuthenticationMethodConfigurationapplies the update to the existing FIDO2 policy. -
The final
Get-...call outputs the updated policy so you can verify the changes.
Troubleshooting
Users do not see passwordless options at sign-in
-
Confirm the relevant method (Authenticator, FIDO2, Windows Hello) is enabled and targeted to the user in Authentication methods > Policies.
-
Verify the user has successfully registered the method at https://mysignins.microsoft.com/security-info and that the device/app is healthy.
FIDO2 key registration fails in the browser
-
Ensure the browser and OS support WebAuthn/FIDO2 (modern versions of Edge, Chrome, etc.).
-
Check if Enforce attestation or key restriction policies are blocking the model; test with a known-good, supported key.
Windows Hello for Business not offered
-
Confirm device meets OS and TPM requirements and is Entra-joined or hybrid-joined.
-
Verify Windows Hello policies are enabled via Intune or Group Policy and that no conflicting policies disable it.
Graph script fails with permission/403 errors
-
Ensure the signed-in admin has the required Graph permissions and has granted consent where needed.
-
Confirm the Microsoft Graph PowerShell module is up to date.
Expected Outcome
Configure Phishing-Resistant MFA Policy in Entra ID
|
Field |
Details |
|
Document Type |
How-To Guide / Runbook |
|
Applies To |
Microsoft Entra ID, Microsoft 365, Azure portals, Cloud Apps integrated with Entra ID |
|
Audience |
Entra ID / Security Administrators (2nd Line / Systems Admin / Security Ops) |
|
Author |
AK. Udofeh |
|
Last Updated |
March 2026 |
Overview
This document explains how to configure a phishing-resistant MFA Conditional Access policy using Authentication Strengths in Microsoft Entra ID. It covers report-only testing, scope control, and safe enforcement for privileged roles and high-value applications.
Background
-
Standard Conditional Access policies using “Require multi-factor authentication” allow weaker methods (SMS, phone call, basic app OTP) which are still vulnerable to phishing and adversary-in-the-middle attacks.
-
Organisations need to ensure that privileged accounts and sensitive applications can only be accessed with phishing-resistant methods such as FIDO2 security keys or other certified resistant mechanisms.
-
Without Authentication Strength-based policies, admins cannot reliably enforce use of only strong, passwordless MFA for high-risk scenarios.
Basic steps that do not resolve this:
-
Enabling MFA per user or via a simple Conditional Access “Require MFA” without specifying authentication strength.
-
Relying solely on security defaults for tenants with advanced security requirements.
Other affected services/systems:
-
Admin portals (Entra admin centre, Azure portal, Exchange admin centre), Microsoft 365 apps, and any SSO-integrated SaaS app federated via Entra ID will be subject to this policy when in scope.
Usecase
-
Older Conditional Access policies were designed before Authentication Strengths and only distinguished “MFA vs no MFA”, not which MFA methods are acceptable.
-
Attackers now commonly bypass weak MFA using real-time phishing and token replay, so stronger, phishing-resistant methods must be enforced where feasible.
Desired End State
-
Admins enable passwordless / phishing-resistant methods (Authenticator phone sign-in, FIDO2, etc.).
-
Admins create Conditional Access policies that require Phishing-resistant MFA strength or Passwordless MFA strength for sensitive scenarios.
-
Users in scope can satisfy the policy only with compliant strong methods; weaker methods are rejected.
What currently breaks:
-
Existing CA policies allow weak MFA methods, so users can still sign in with SMS or legacy app codes, leaving privileged access exposed to phishing.
Known triggers:
-
High-risk user roles (Global Admin, Security Admin, Exchange Admin, etc.).
-
Access to high-value applications, admin portals, or from risky locations/devices.
Before You Start
Implementation Steps
1. Create a Report-Only Phishing-Resistant Policy
-
Sign in to https://entra.microsoft.com as a Conditional Access or Security Administrator.
-
Go to Entra ID > Conditional Access > Policies and select New policy.
-
Name the policy clearly, for example:
CA01 - Phishing-resistant MFA for Admins (Report-only). -
Under Assignments > Users, select Directory roles and choose roles such as Global Administrator, Security Administrator, Exchange Administrator, and other privileged roles. (Ensure to exclude break glass and service accounts)
-
Under Cloud apps or actions, select All cloud apps or a subset of high-value apps (Exchange Online, SharePoint Online, Entra admin centre, Azure portal).
-
Under Conditions, configure any additional conditions as needed (e.g. include all device platforms initially, or exclude trusted Workload identities).
-
Under Access controls > Grant, choose Require authentication strength and select Phishing-resistant MFA strength.
-
Set Enable policy to Report-only.
This allows sign-ins to proceed but logs whether they would satisfy the policy.
9. Click Create to save the policy.
2. Monitor Report-Only Results
-
Allow at least some days of normal usage for covered users.
-
In the Entra admin centre, go to Entra ID > Conditional Access > Insights and reporting and review the policy’s impact.
-
Use filters such as Policy not satisfied to identify sign-ins that would be blocked if enforced (e.g. users still using SMS).
-
Export reports for further analysis and plan user remediation or enrolment in passwordless methods where required.
3. Create / Adjust Production Enforcement Policy
-
Duplicate the tested report-only policy or create a new production policy with the same conditions.
-
Under Assignments > Users, keep scope limited initially (e.g. only core admin roles or a pilot group).
Avoid tenant-wide enforcement until adoption is high.
3. Under Assignments > Users > Exclude, add:
-
-
Break-glass accounts.
-
Conditional Access / Global Admins used for emergency recovery (per your policy).
-
4. Under Access controls > Grant, ensure Require authentication strength is set to Phishing-resistant MFA strength (or a custom
strength including FIDO2, etc.).
5. Set Enable policy to On.
6. Save the policy and notify in-scope admins to use their phishing-resistant methods going forward.
4. (Optional) Use Authentication Strength with Passwordless MFA
-
For broader user populations that may not yet be able to use fully phishing-resistant methods, create another Conditional Access policy:
-
Grant > Require authentication strength > Passwordless MFA strength for high-value apps, allowing strong but not necessarily certified phishing-resistant methods.
-
-
Apply similar report-only and enforcement phases to minimise disruption.
Automated / Script Option (Graph PowerShell Example)
Example policy that creates a report-only Conditional Access policy requiring phishing-resistant MFA strength for key admin roles.
# Connect to Microsoft Graph with appropriate scopes
Connect-MgGraph -Scopes "Policy.Read.All","Policy.ReadWrite.ConditionalAccess"

# Built-in Phishing-resistant MFA authentication strength ID
$phishResistantStrengthId = "00000000-0000-0000-0000-000000000004"

# Define key admin roles (template IDs)
$adminRoles = @(
    "62e90394-69f5-4237-9190-012177145e10", # Global Administrator
    "194ae4cb-b126-40b2-bd5b-6091b380977d", # Security Administrator
    "29232cdf-9323-42fd-ade2-1d097af3e4de"  # Exchange Administrator
)

# Build the Conditional Access policy body
$policyParams = @{
    DisplayName = "Require phishing-resistant MFA for admins (Report-only)"
    State       = "enabledForReportingButNotEnforced" # Report-only mode
    Conditions  = @{
        Users = @{
            IncludeRoles = $adminRoles             # Target listed directory roles
        }
        Applications = @{
            IncludeApplications = @("All")         # All cloud apps
        }
    }
    GrantControls = @{
        Operator = "OR"
        AuthenticationStrength = @{
            Id = $phishResistantStrengthId        # Built-in Phishing-resistant MFA strength
        }
    }
}

# Create the Conditional Access policy
New-MgIdentityConditionalAccessPolicy -BodyParameter $policyParams
Deployment notes:
-
Run as a privileged admin with permission to manage Conditional Access.
-
Adjust
$adminRolesandIncludeApplicationsto suit your environment.
Expected output / success indicators:
-
New-MgIdentityConditionalAccessPolicyreturns the created policy object withstateset toenabledForReportingButNotEnforcedand the correct authentication strength ID.
Script Breakdown
-
Connect-MgGraphestablishes a session with Microsoft Graph using scopes for Conditional Access policy management. -
$phishResistantStrengthIdholds the known ID of the built-in Phishing-resistant MFA strength, which defines allowed methods such as FIDO2 keys. -
$adminRoleslists the directory role template IDs for privileged admin roles that will be included in the policy. -
$policyParamsdefines policy properties:-
DisplayNamegives a descriptive name. -
StateasenabledForReportingButNotEnforcedplaces the policy in report-only mode. -
Conditions.Users.IncludeRolestargets specific directory roles. -
Conditions.Applications.IncludeApplications = "All"targets all cloud apps. -
GrantControls.AuthenticationStrength.Idreferences the phishing-resistant MFA strength.
-
-
New-MgIdentityConditionalAccessPolicysends the policy definition to Graph and creates the policy in Entra ID.
Troubleshooting
Users are blocked after policy enforcement
-
Use Sign-in logs to verify which policy blocked access and what authentication method was used.
-
Check whether affected users have registered any phishing-resistant methods (FIDO2, etc.). If not, move them temporarily out of scope or provide registration guidance.
Policy does not appear to have any effect
-
Confirm the policy is Enabled (not just in report-only) for enforcement scenarios.
-
Verify the user and app in question are actually within Assignments and not excluded by another condition or exclusion.
Graph script fails with insufficient privileges
-
Ensure the account running the script has Conditional Access Administrator or equivalent role and that Graph scopes include
Policy.ReadWrite.ConditionalAccess. -
If using app-only auth, ensure the app registration has
Policy.ReadWrite.ConditionalAccessapplication permissions and admin consent granted.
Conflicts with existing policies
-
Review other Conditional Access policies in What If or simulation tools to check aggregate effect.
-
Consolidate overlapping policies or adjust priority/scope to avoid unexpected blocks.
Expected Outcome
How-To: Set Up App Registrations for Automated Entra ID Administration
|
Field |
Details |
|
Document Type |
How-To Guide / Runbook |
|
Applies To |
Microsoft Entra ID, PowerShell, Microsoft Graph SDK |
|
Audience |
Systems Administrators / DevOps |
|
Author |
AK. Udofeh |
|
Last Updated |
April 2026 |
Overview
Background
To interact with Entra ID via automation or the command line without using personal user credentials, a Service Principal is required. Standard user accounts often have MFA or conditional access policies that interfere with headless automation; an App Registration provides a controlled, auditable, and secure method for programmatic access.
Before You Start
| Check | Where |
|---|---|
| Sufficient Permissions | Ensure you have 'Application Developer' or 'Cloud Application Administrator' roles. |
| Microsoft Graph SDK | Install the module: Install-Module Microsoft.Graph |
| Client Credentials | Have a naming convention ready (e.g., Svc-Entra-Config). |
Configuration Steps
- Register the Application:
- Navigate to https://entra.microsoft.com> Entra ID > App Registrations > New Registration.
- Enter a meaningful display name (e.g. AppName SSO).
- Under Supported account types, select Accounts in this organisational directory only (Single tenant) unless multi-tenant access is required.
- Leave the Redirect URI blank.
- Click Register.
- Generate Credentials:
- Go to Certificates & secrets > Client secrets.
- Create a new secret.
- Give it a description for future reference.
Copy the secret Value immediately; it will be masked permanently once you leave the blade.
3. Configure API Permissions:
-
- Go to API permissions > Add a permission > Microsoft Graph.
- Select Application permissions.
- Add
Application.ReadWrite.All(for SSO/App config) andDirectory.Read.All. - Select:, Grant admin consent for [Tenant].
4. Elevate via Directory Roles (Conditional):
Only perform this step if API permissions above result in "Access Denied" for specific administrative tasks.
Automated / Script Option - PowerShell
# Define connection variables
$TenantId = "your-tenant-id"
$ClientId = "your-client-id"
$ClientSecret = "your-client-secret" | ConvertTo-SecureString -AsPlainText -Force

# Create credential object for non-interactive login
$Credential = New-Object System.Management.Automation.PSCredential($ClientId, $ClientSecret)

# Connect to Microsoft Graph using the App Registration
# This uses the Client Credentials flow
Connect-MgGraph -TenantId $TenantId -Credential $Credential

# Success Indicator: Retrieve Tenant details to verify connection
Get-MgOrganization | Select-Object DisplayName, Id
Script Breakdown
- Variable Definition: Stores the IDs and secrets generated in the portal. The secret is converted to a
SecureStringfor compatibility with PowerShell credential objects. - Connect-MgGraph: Establishes the session. Because a
Credentialobject is passed, it bypasses the interactive browser login. - Get-MgOrganization: A simple test command. If the terminal returns your organisation's name, the authentication was successful.
Automated / Script Option - zsh
export ARM_CLIENT_ID="your-app-id"
export ARM_CLIENT_SECRET="your-app-password"
export ARM_SUBSCRIPTION_ID="your-sub-id"
export ARM_TENANT_ID="your-tenant-id"
Troubleshooting
- Cause: The App Registration lacks the specific Graph API scope or the Directory Role required for the task.
- Fix: Ensure Admin Consent was clicked in the portal. If the error persists, assign the Cloud Application Administrator directory role to the app as detailed in the manual steps.
- Cause: An existing interactive session is active in the terminal.
- Fix: Run
Disconnect-MgGraphbefore attempting to connect with the App Registration credentials.
Expected Outcome
| Metric | Detail |
|---|---|
| Resolution Time | 10–15 Minutes |
| User Impact | None (Backend configuration only) |
| Recurrence Risk | Low (Credentials expire based on secret lifetime) |
Blocking Device Code Flow in Microsoft Entra ID
|
Field |
Details |
|
Document Type |
Blocking Device Code Flow in Microsoft Entra ID |
|
Applies To |
Microsoft Entra ID, Conditional Access policy |
|
Audience |
2nd Line / Entra ID Admins / IT Engineer |
|
Author |
AK. Udofeh |
|
Last Updated |
April 2026 |
Overview
Device Code Flow allows users to authenticate on one device by entering a code on another. While useful for devices with limited input, it introduces significant phishing risk and can enable access from unmanaged devices.
This guide walks through configuring a Conditional Access policy to block Device Code Flow.
Prerequisites
- Microsoft Entra ID P1 (or higher)
- Conditional Access Administrator (or equivalent role)
- Emergency / break-glass accounts identified
Step 1: Access Conditional Access Policies
- Sign in to the Microsoft Entra admin center
- Navigate to:
Entra ID > Conditional Access > Policies - Select + New policy
Step 2: Define Policy Scope
Users
- Include: All users (recommended)
- Exclude:
- Emergency access accounts
- Break-glass accounts
Always maintain at least one account excluded to prevent lockout
Step 3: Target Resources
- Select Target resources (Cloud apps)
- Include: All resources (recommended)
Step 4: Configure Authentication Flow Condition
Step 5: Block Access
- Go to:
Access Controls > Grant - Select:
- Block access
- Click Select
Step 6: Enable in Report-Only Mode (Recommended)
- Set policy state to: Report-only
- Click Create
This allows you to assess impact before enforcing
Step 7: Validate Impact
Identify:
- Users
- Applications
- Dependencies
Step 8: Enforce Policy
Once validated:
- Change policy state from Report-only > On
- Monitor for failures and adjust exclusions if required
Important Considerations
- Device Code Flow is often used by:
- Azure CLI / PowerShell
- Teams Rooms / shared devices
- Blocking may impact these scenarios
Microsoft recommends blocking unless explicitly required
Best Practices
- Start in report-only mode
- Keep exclusions minimal and reviewed regularly
- Monitor sign-in logs continuously
- Prefer modern, secure authentication methods
Summary
Blocking Device Code Flow reduces exposure to phishing attacks that exploit cross-device authentication. This control strengthens identity security by eliminating a high-risk authentication path.
Blocking Authentication Transfer in Microsoft Entra ID
|
Field |
Details |
|
Document Type |
Blocking Authentication Transfer in Microsoft Entra ID |
|
Applies To |
Microsoft Entra ID, Conditional Access policy |
|
Audience |
2nd Line / Entra ID Admins / IT Engineer |
|
Author |
AK. Udofeh |
|
Last Updated |
April 2026 |
Overview
Authentication Transfer allows a user to authenticate on one device and transfer that session to another (e.g. scanning a QR code to sign into a mobile app).
While convenient, it introduces risks where authentication can be extended to unmanaged or untrusted devices.
This guide shows how to restrict or block this behaviour using Conditional Access.
Prerequisites
- Microsoft Entra ID P1 (or higher)
- Conditional Access Administrator role
- Identified exclusion accounts (break-glass)
Step 1: Access Conditional Access Policies
- Sign in to the Microsoft Entra admin center
- Navigate to:
Entra ID > Conditional Access > Policies - Select + New policy
Step 2: Define Policy Scope
Users
- Include:
- All users OR specific groups
- Exclude:
- Emergency / break-glass accounts
Exclusions should be tightly controlled and reviewed regularly
Step 3: Target Resources
- Select:
Target resources (Cloud apps) - Include:
- All resources or specific applications
Step 4: Configure Authentication Flow Condition
Step 5: Block Access
- Go to:
Access Controls > Grant - Select:
- Block access
- Click Select
Step 6: Enable Policy
- Set policy state to: On
- Click Create
Step 7: Validate Behaviour
- Test scenarios:
- QR-based login
- Cross-device sign-in flows
- Review:
- Sign-in logs
- Conditional Access results
Important Considerations
Blocking Authentication Transfer may impact:
- Mobile app onboarding flows
- QR code-based sign-ins
- Cross-device authentication experiences
This feature is enabled by default and must be explicitly controlled via policy
Best Practices
- Apply to high-risk user groups first
- Consider restricting instead of fully blocking where needed
- Combine with:
- Device compliance policies
- MFA enforcement
Summary
Blocking Authentication Transfer prevents authentication from being silently extended across devices, reducing the risk of unauthorized access from unmanaged endpoints.
This ensures authentication remains tied to trusted and controlled environments.
Configuring Entra ID CA Policies for Authentication Flows
| Field |
Details |
|
Document Type |
Configuring Entra ID CA Policies for Authentication Flows |
|
Applies To |
Microsoft Entra ID, Conditional Access policy |
|
Audience |
2nd Line / Entra ID Admins / IT Engineer |
|
Author |
AK. Udofeh |
|
Last Updated |
May 2026 |
Overview
This guide outlines how to configure Conditional Access policies in Microsoft Entra ID to control:
* Device Code Flow
* Authentication Transfer
These authentication methods can introduce elevated phishing and unmanaged device risks if not explicitly governed.
Device Code Flow
Device Code Flow is similar to signing in to Netflix or Xbox on a Smart TV, where the TV displays a code and instructs the user to complete sign-in on another device such as a phone or laptop. Once authentication is completed, the Smart TV is automatically signed in.
Example:
Example: Go to https://microsoft.com/devicelogin or https://www.netflix.com/tv2 and enter this code.
Authentication Transfer
Authentication Transfer is similar to being signed in on Device A and then scanning a QR code using Device B, allowing the authenticated session or trust to be transferred so that Device B becomes signed in without performing a full standalone authentication process again.
This guide demonstrates how to govern these flows using Conditional Access policies to reduce exposure to indirect authentication attacks.
Prerequisites
* Microsoft Entra ID P1 or higher
* Conditional Access Administrator role
* Emergency / break-glass accounts identified
* Access to Microsoft Entra admin center
Step 1: Create New Conditional Access Policy
1. Sign in to the Microsoft Entra admin center
3. Select + New policy
4. Enter a policy name:
* Example: CA - Block Authentication Flows
Step 2: Configure User Scope
Under Assignments → Users:
* Include:
All users (recommended)
* Exclude:
* Emergency access accounts
* Break-glass administrator accounts
Avoid applying policies to all accounts without exclusions.
Step 3: Configure Target Resources
Under Assignments → Target resources:
* Select:
*. All cloud apps
This ensures consistent enforcement across Microsoft 365 resources.
Step 4: Configure Authentication Flows
2. Set:
* Configure = Yes
1. Select required flows:
* Device Code Flow
* Authentication Transfer
2. Click Done
Step 5: Configure Access Control
Under Access controls → Grant:
* Select:
* Block access
* Click Select
This blocks authentication attempts using the selected flows.
Step 6: Enable Report-Only Mode
Before enforcement:
* Set policy state to:
* Report-only
* Click Create
This allows impact analysis without disrupting users.
Validation
Review:
* Entra ID > Monitoring > Sign-in logs
Validate:
* Impacted users
* Authentication flow usage
* Conditional Access evaluation results
Monitor for:
* Developer tooling dependencies
* QR-based onboarding scenarios
Enforcement
Once validated:
1. Edit the Conditional Access policy
2. Change:
* Report-only > On
3. Continue monitoring sign-in activity and failures post-deployment.
️ Flow Overview
User Authentication Attempt
* Authentication Flow Detection
* Conditional Access Evaluation
* Block / Allow Decision
* Resource Access Outcome
Security Control Points:
· Device Code Flow restriction
· Authentication Transfer restriction
· Sign-in logging and monitoring
Summary
This configuration strengthens Microsoft Entra ID security posture by restricting high-risk authentication flows commonly associated with phishing and indirect access scenarios.