# Exchange Online
This Book Section holds Exchange Online related documentations
# Outlook Desktop - Repeated Sign-In Prompt (WAM BrokerPlugin Reset)
| **Field**
| **Details**
|
| Document Type
| Known Issue - Workaround
|
| Applies To
| Microsoft Outlook Desktop (Classic), Windows 10/11, Microsoft 365 / Exchange Online
|
| Audience
| 2nd Line Support / Exchange Online Admins
|
| Author
| AK. Udofeh
|
| Last Updated
| February 2026
|
**Overview**
This article documents a workaround for a recurring issue where Outlook Desktop prompts users to sign in repeatedly — as frequently as every 15 minutes to every hour - without retaining the session after completing authentication. This issue can affect individual users or a large number of users simultaneously across an organisation.
## **The Issue**
Users open Outlook and are presented with a **"Sign In"** prompt unexpectedly. After signing in successfully, the prompt reappears again after a short period. The following self-service steps do **not** resolve the issue:
- Restarting the laptop or PC
- Signing out of Outlook and signing back in
- Restarting Microsoft Teams or other Office apps
The issue may also surface across other Microsoft 365 services (Teams, OneDrive, SharePoint) simultaneously, as they share the same underlying authentication component.
## **Root Cause**
Modern Microsoft 365 applications do not handle authentication directly. Instead, they delegate all sign-in and token management to a Windows OS component called **Web Account Manager (WAM)** and its associated background plugin: **`Microsoft.AAD.BrokerPlugin`**.
## Normal Authentication Flow
| User opens Outlook
↓
Outlook requests a token from WAM
↓
WAM calls Microsoft.AAD.BrokerPlugin
↓
Plugin communicates with Microsoft Entra ID
↓
Entra ID returns an OAuth access token (valid ~1 hour)
and a refresh token (valid up to 90 days)
↓
WAM silently refreshes the token in the background
when it expires - user is never prompted again
|
## **What Breaks the Flow**
When the **`Microsoft.AAD.BrokerPlugin`** folder becomes corrupted or enters a broken state, the silent background refresh fails. When the 1-hour access token expires, Outlook falls back to prompting the user because WAM cannot silently obtain a new one.
## **Known Triggers**
This corruption can occur due to, but is not limited to:
- **Windows OS cumulative/security updates** (confirmed trigger - February 2026 Patch Tuesday, build 10.0.29510.1001 and earlier - January 2026 KB5074109)
- Incomplete or interrupted Microsoft 365 app updates
- User profile corruption
- Mid-session password or MFA changes in Entra ID
- Entra ID token store inconsistencies after account modifications
This workaround applies to all of the above scenarios. If a user is experiencing the repeated Outlook sign-in prompt and no Conditional Access policy or service health incident is identified as the cause, resetting the BrokerPlugin is the recommended first-line fix.
## **Before You Start**
Rule out the following before applying this fix at scale:
| Check | Where |
|---|
| Active Microsoft service incident | M365 Admin Center > Health > Service Health |
| Recently modified Conditional Access policy | Entra Admin Center > Protection > Conditional Access |
| User password recently expired or changed | Entra Admin Center > Users |
| Entra sign-in logs showing policy interrupts | Entra Admin Center > Monitoring > Sign-in Logs |
If none of the above are present, proceed with the fix below.
## **Fix: Manual Steps (Per Machine)**
Run on the affected user's machine, logged in as that user. You do not need to be a local admin for Steps 1–4.
## **Step 1: Close All Microsoft Applications**
Fully close **Outlook, Teams, OneDrive** and any other Office applications. Check the system tray and ensure none are still running in the background.
## **Step 2: Navigate to the BrokerPlugin Folder**
Press `Win + R` and enter:
`%localappdata%\Packages`
Locate the following folder:
`Microsoft.AAD.BrokerPlugin_cw5n1h2txyewy`
## **Step 3: Rename the Folder**
Rename the folder by appending `.old` to the end:
`Microsoft.AAD.BrokerPlugin_cw5n1h2txyewy.old`
Do not delete the folder. Renaming it preserves a backup and instructs Windows to recreate it fresh on next boot. If you encounter the error "The action can't be completed because the folder or a file in it is open in another program", see the Troubleshooting section below before continuing.
## **Step 4: Clear Cached Credentials**
1. Open **Control Panel → Credential Manager → Windows Credentials**
2. Remove all entries beginning with:
- `MicrosoftOffice16_*`
- `msteams_*`
- `Microsoft_OC_*`
- Any entry referencing `office.com` or `outlook.com`
## **Step 5: Reboot the Machine**
Perform a **full restart** (not sign out). Windows will automatically recreate the `Microsoft.AAD.BrokerPlugin` folder in a clean state on boot.
## Step 6: Sign Back Into Outlook
Open Outlook. When prompted, sign in once. The session should persist without re-prompting.
### **Fix: Automated Script (Bulk Deployment)**
Use this script for fleet-wide remediation via RMM tool, Intune Remediation Script, or GPO logon script.
Important: This script must run in the affected user's context, not as SYSTEM or a local admin account. The BrokerPlugin folder is per-user profile.
```powershell
# Step 1: Kill processes holding the BrokerPlugin before rename
Stop-Process -Name "Microsoft.AAD.BrokerPlugin" -Force -ErrorAction SilentlyContinue
Stop-Process -Name "backgroundTaskHost" -Force -ErrorAction SilentlyContinue
Stop-Process -Name "RuntimeBroker" -Force -ErrorAction SilentlyContinue
# Brief pause to allow process termination to complete
Start-Sleep -Seconds 2
# Step 2: Rename the BrokerPlugin folder
$brokerPath = "$env:LOCALAPPDATA\Packages\Microsoft.AAD.BrokerPlugin_cw5n1h2txyewy"
if (Test-Path $brokerPath) {
try {
Rename-Item -Path $brokerPath -NewName "$brokerPath.old" -Force -ErrorAction Stop
Write-Output "SUCCESS: BrokerPlugin reset complete. Reboot required."
}
catch {
Write-Output "ERROR: Failed to rename BrokerPlugin folder. $($_.Exception.Message)"
}
} else {
Write-Output "INFO: BrokerPlugin folder not found or already reset. No action taken."
}
```
**Post-deployment:** Push a reboot policy immediately after the script runs, or instruct users to restart when prompted.
## Troubleshooting — "The Action Can't Be Completed" Rename Error
If Windows displays:
> *The action can't be completed because the folder or a file in it is open in another program"*
This means a background Windows process is still holding a lock on the folder even though all visible apps are closed. The `Microsoft.AAD.BrokerPlugin` process runs silently in the background and can respawn quickly. Use the following method to identify and terminate it before retrying the rename:
## Using Windows Resource Monitor (No Additional Tools Required)
1. Press `Win + R` and run:
`perfmon.exe /res`
1. In Resource Monitor, select the **CPU** tab
2. Scroll down and expand the **Associated Handles** section
3. In the search box, type:
`AAD.BrokerPlugin`
1. Press **Enter** — Resource Monitor will display all processes currently holding a handle on the folder
2. Right-click each result → **End Process**
3. Immediately return to the folder and complete the rename (Step 3 above) before the process respawns
## **Expected Outcome**
| | |
|---|
| **Resolution time** | Under 5 minutes + reboot |
| **User impact** | One-time sign-in prompt after reboot, then session persists normally |
| **Recurrence** | Should not recur unless a subsequent update re-introduces the regression |
# Google Workspace to Exchange Online Mail Migration
| **Field** | **Details**
|
| Document Type
| Google Workspace to Exchange Online Mail Migration
|
| Applies To
| Exchange Online, Google Workspace, Google API, Google Cloud
|
| Audience
| Systems Administrator / IT Engineer
|
| Author
| AK. Udofeh
|
| Last Updated
| May 2026
|
## **[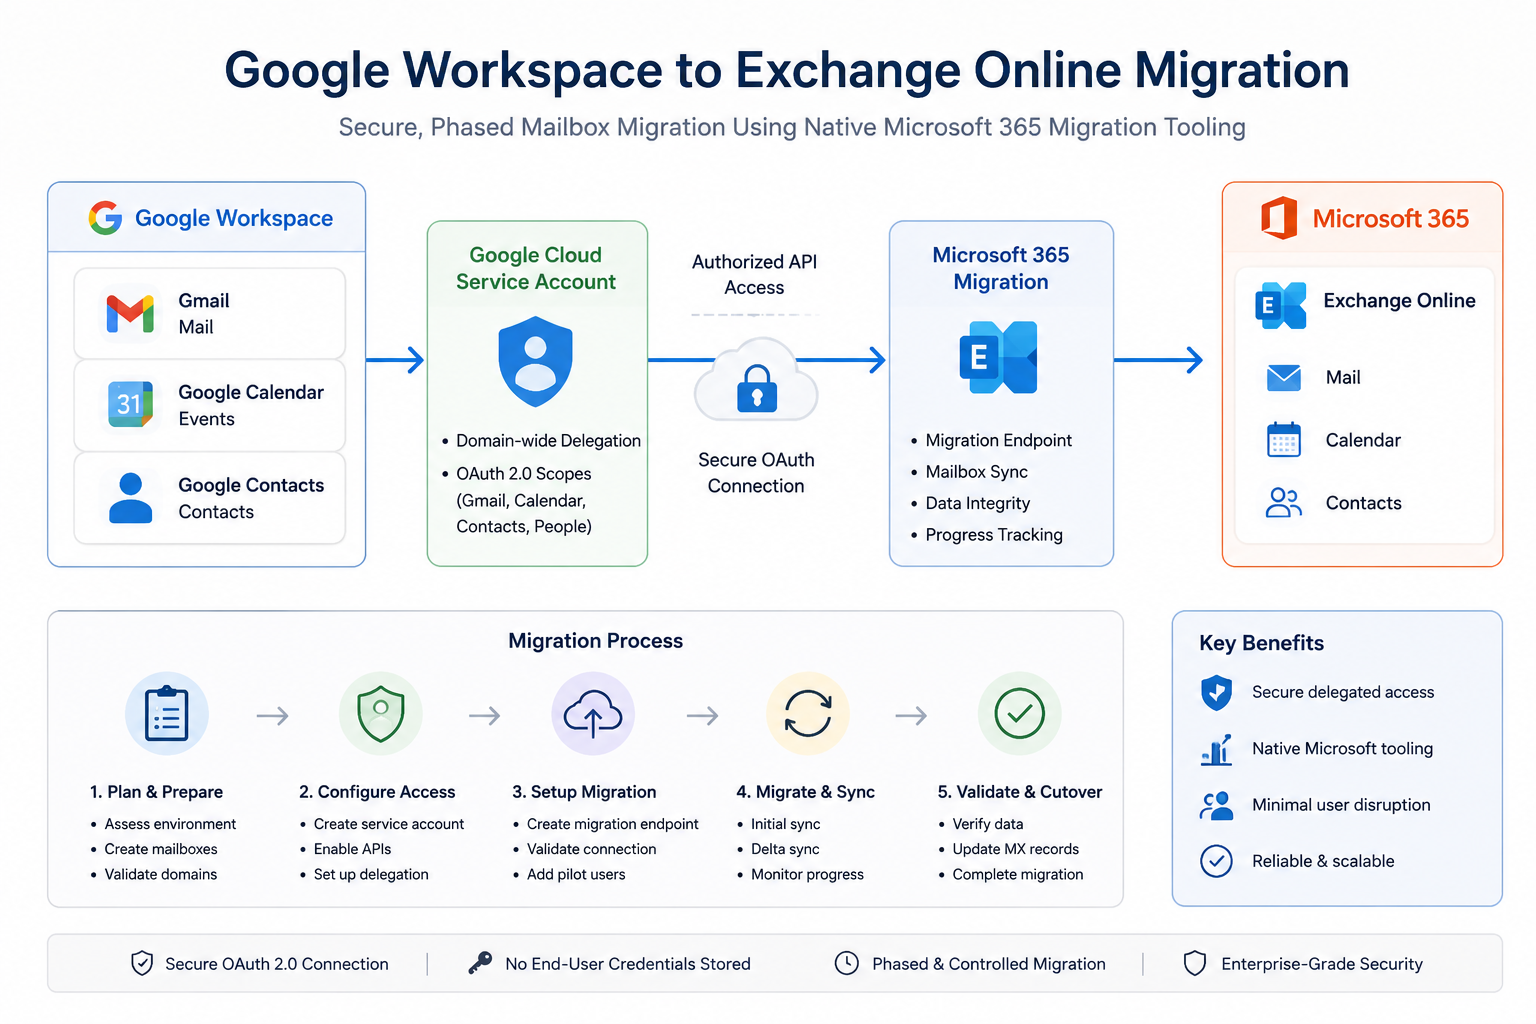](https://docs.aktechnoservices.com/uploads/images/gallery/2026-05/google-exchange-migration.png)Overview**
This configuration enables mailbox migration from Google Workspace (Gmail) to Microsoft Exchange Online using the native migration functionality built into the Exchange Admin Center (EAC).
The migration process uses a Google Cloud service account with delegated access to securely read Gmail, Calendar, and Contacts data from Google Workspace and import it into Microsoft 365 mailboxes.
This approach is important because it:
- Enables centralized migration management from Microsoft 365
- Supports staged or pilot migrations
- Minimises manual mailbox export/import operations
- Preserves mail, calendars, and contacts during migration
The configuration mitigates risks associated with:
- Manual PST exports
- Incomplete mailbox migrations
- Credential sharing
- Unsecured mailbox access methods
##### **Prerequisites**
##### **Required Licenses**
##### **Microsoft 365**
- Exchange Online Plan 1 or higher
- Microsoft 365 Business Premium / E3 / E5 recommended
##### **Google Workspace**
- Google Workspace Business or Enterprise subscription
- Super Admin access required
##### **Required Roles & Permissions**
##### **Microsoft 365**
The administrator performing the migration requires:
- Exchange Administrator
or
- Global Administrator
##### **Google Workspace**
The administrator requires:
- Super Admin role
##### **Dependencies**
The following services must be accessible:
- Exchange Online
- Google Workspace Admin Console
- Google Cloud Console
##### **Preparation Tasks**
Before beginning:
- Create Microsoft 365 mailboxes for all users being migrated
- Verify domains in Microsoft 365
- Ensure users have Exchange Online licenses assigned
- Confirm mailbox sizes and available storage
- Plan migration window and user communication
##### **Step 1: Configure Google Cloud Service Account**
##### **Create Google Cloud Project**
Navigate to:
[https://console.cloud.google.com/](https://console.cloud.google.com/)
Create a new project.
Example:
*M365Migration*
##### **Create Service Account**
Navigate to:
*IAM & Admin → Service Accounts*
Select:
*Create Service Account*
Example service account name:
*exchange-migration*
Select:
- Create
- Done
##### **Enable Domain-Wide Delegation**
Open the newly created service account.
Navigate to:
*Details > Show Domain-wide Delegation*
Enable:
*Enable Google Workspace Domain-wide Delegation*
Enter a product name:
*Exchange Migration*
Save the configuration.
##### **Record the Client ID**
Within the service account:
- Copy the Unique ID / Client ID
- Save it securely
This ID will later be used for delegated access configuration.
##### **Create JSON Key**
Navigate to:
Keys > Add Key > Create New Key
Select
- JSON
Download and securely store the JSON key file.
Treat this file as sensitive credential material.
##### **Step 2: Configure Google Workspace Delegated Access**
Navigate to:
*Google Admin Console > Security > Access and Data Control > API Controls*
Select:
*Manage Domain Wide Delegation*
Select:
*Add New*
##### **Configure Delegated Access**
##### **Client ID**
Paste the service account Client ID copied earlier.
##### **OAuth Scopes**
Enter the following scopes exactly as shown:
*https://mail.google.com/,https://www.googleapis.com/auth/calendar,https://www.google.com/m8/feeds/,https://www.googleapis.com/auth/gmail.settings.sharing,https://www.googleapis.com/auth/contacts*
Important:
- Do not add spaces
- Use comma-separated format only
- Incorrect scopes will cause migration failures later
Select:
*Authorize*
##### **Step 3 — Enable Required Google APIs**
In the Project page, navigate to:
[https://console.cloud.google.com/apis/library](https://console.cloud.google.com/apis/library)
Ensure the correct migration project is selected.
Click Enable API Services and enable the following APIs:
| **API**
| **Required**
|
| Gmail API
| Yes
|
| Google Calendar API
| Yes
|
| Contacts API
| Yes
|
| People API
| Yes
|
##### **Step 4: Configure Migration Endpoint in Exchange Online**
Navigate to:
Exch*ange Admin Center > Migration*
Select:
*Add Migration Batch*
##### **Migration Path**
Choose:
*Google Workspace (Gmail)*
##### **Migration Endpoint Configuration**
##### **Email Address**
Enter a Google Workspace Super Admin account.
Example:
*admin@company.com*
Do not use the service account email address.
##### **JSON Key File**
Upload the downloaded JSON key file created earlier.
##### **Verification**
If endpoint validation repeatedly fails:
- Enable Skip Verification
- Continue with pilot migration testing
Google propagation delays may cause temporary validation failures.
##### **Step 5: Access Control / Enforcement**
##### **Recommended Migration Scope**
For production safety:
- Begin with pilot users only
- Avoid immediate tenant-wide migration
Recommended pilot group:
- IT administrators
- Test users
- Low-risk business users
##### **Recommended Mail Flow Strategy**
During migration:
- Keep Google Workspace as primary mail delivery platform
- Do not switch MX records immediately
Switch MX records only after:
- Mailbox validation
- User acceptance testing
- Successful pilot migration completion
##### **Step 6: Testing / Report Mode**
##### **Recommended Pilot Migration Process**
Migrate:
- One mailbox initially
- Validate data integrity
- Confirm permissions and access
##### **Validate Migrated Data**
Confirm:
- Emails migrated successfully
- Folder structure preserved
- Calendar items imported
- Contacts available
- Outlook access functional
**User Validation**
Perform:
- Outlook sign-in testing
- OWA testing
- Mobile device testing
##### **Step 7: Monitoring & Validation**
##### **Exchange Online Monitoring**
Navigate to:
Exchange Admin Center > Migration
Monitor:
- Batch status
- Sync progress
- Failed items
- Skipped items
##### **Google Workspace Validation**
Validate:
- API access remains active
- Service account remains enabled
- Delegation settings remain configured
##### **Common Issues to Monitor**
| **Issue**
| **Likely Cause**
|
| Endpoint validation failure
| Propagation delay
|
| Authentication failure
| Incorrect OAuth scopes
|
| Mailbox sync failure
| API not enabled
|
| Permission denied
| Delegation not configured
|
| Rate limiting
| Excessive retry attempts
|
##### **Step 8: Enforcement / Go-Live**
Once migration validation is complete:
##### **Finalize Migration**
Complete:
- Final synchronization
- User sign-off
- Mail flow cutover
##### **Update MX Records**
Point MX records to Microsoft 365.
Example Microsoft MX target:
*<tenant>.mail.protection.outlook.com*
##### **Post-Cutover Tasks**
Perform:
- Outlook profile validation
- Mobile device reconfiguration
- DNS validation
- Mail flow testing
##### **Important Considerations**
##### **Propagation Delays**
Google delegation and API changes may take:
- 15 minutes to 24 hours
Temporary failures during this period are expected.
##### **Service Account Security**
The JSON key file provides privileged access.
Recommendations:
- Store securely
- Restrict administrator access
- Delete unused keys after migration
##### **Verification Failures**
Microsoft endpoint verification may intermittently fail even when configuration is correct.
Where necessary:
- Use Skip Verification
- Validate with pilot migrations
##### **Large Mailboxes**
Large Gmail mailboxes may:
- Take several hours
- Experience throttling
- Require staged synchronization
##### **Best Practices**
##### **Security Recommendations**
- Use dedicated migration admin accounts
- Restrict service account access
- Remove unused delegation after migration completion
- Rotate or delete JSON keys post-migration
##### **Operational Recommendations**
- Start with pilot users
- Avoid weekend cutovers without validation
- Maintain rollback capability during migration
- Document all DNS changes
##### **Migration Recommendations**
- Migrate mailboxes in batches
- Validate each batch before proceeding
- Communicate migration timelines clearly to users
##### **Summary**
This implementation configured secure mailbox migration from Google Workspace to Exchange Online using Microsoft’s built-in Google Workspace migration functionality.
The process included:
- Google Cloud service account creation
- API enablement
- Domain-wide delegation
- Exchange Online migration endpoint configuration
- Pilot migration validation
- Controlled production rollout
Following this approach provides a secure, enterprise-ready migration process while minimising disruption, authentication issues, and mailbox migration failures.
# Microsoft 365 OAuth Email Integration Runbook (Microsoft Graph)
| **Field**
| **Details**
|
| Document Type
| Runbook
|
| Applies To
| Microsoft 365 OAuth Email Integration Runbook (Microsoft Graph) |
| Audience
| Entra ID & Exchange Online Admins
|
| Author
| AK. Udofeh
|
| Doc Version
| 1.1
|
| Last Updated
| June 2026
|
##### **Design Decision Record (DDR)**
| **Decision** | **Rationale** |
|---|
| Authentication Method | OAuth 2.0 using Microsoft Entra ID to align with Microsoft's modern authentication model. |
| Email API | Microsoft Graph SendMail API preferred over SMTP AUTH for modern SaaS integrations. |
| App Registration | Dedicated App Registration per third-party application to isolate credentials and simplify lifecycle management. |
| Mailbox Strategy | Dedicated Shared Mailboxes are preferred for service-generated emails to simplify administration and auditing. Also eliminates licensing requirements. |
| Permission Model | Least privilege using Microsoft Graph `Mail.Send` Application permission. |
| Application RBAC | Restricts application access using least privilege. |
| Authentication Secret | Client Secret initially, with certificates preferred where supported by the vendor. |
| Monitoring | Exchange Message Trace, Mailbox Audit Logs, Microsoft Entra Sign-in Logs and Microsoft Purview Audit (where available). |
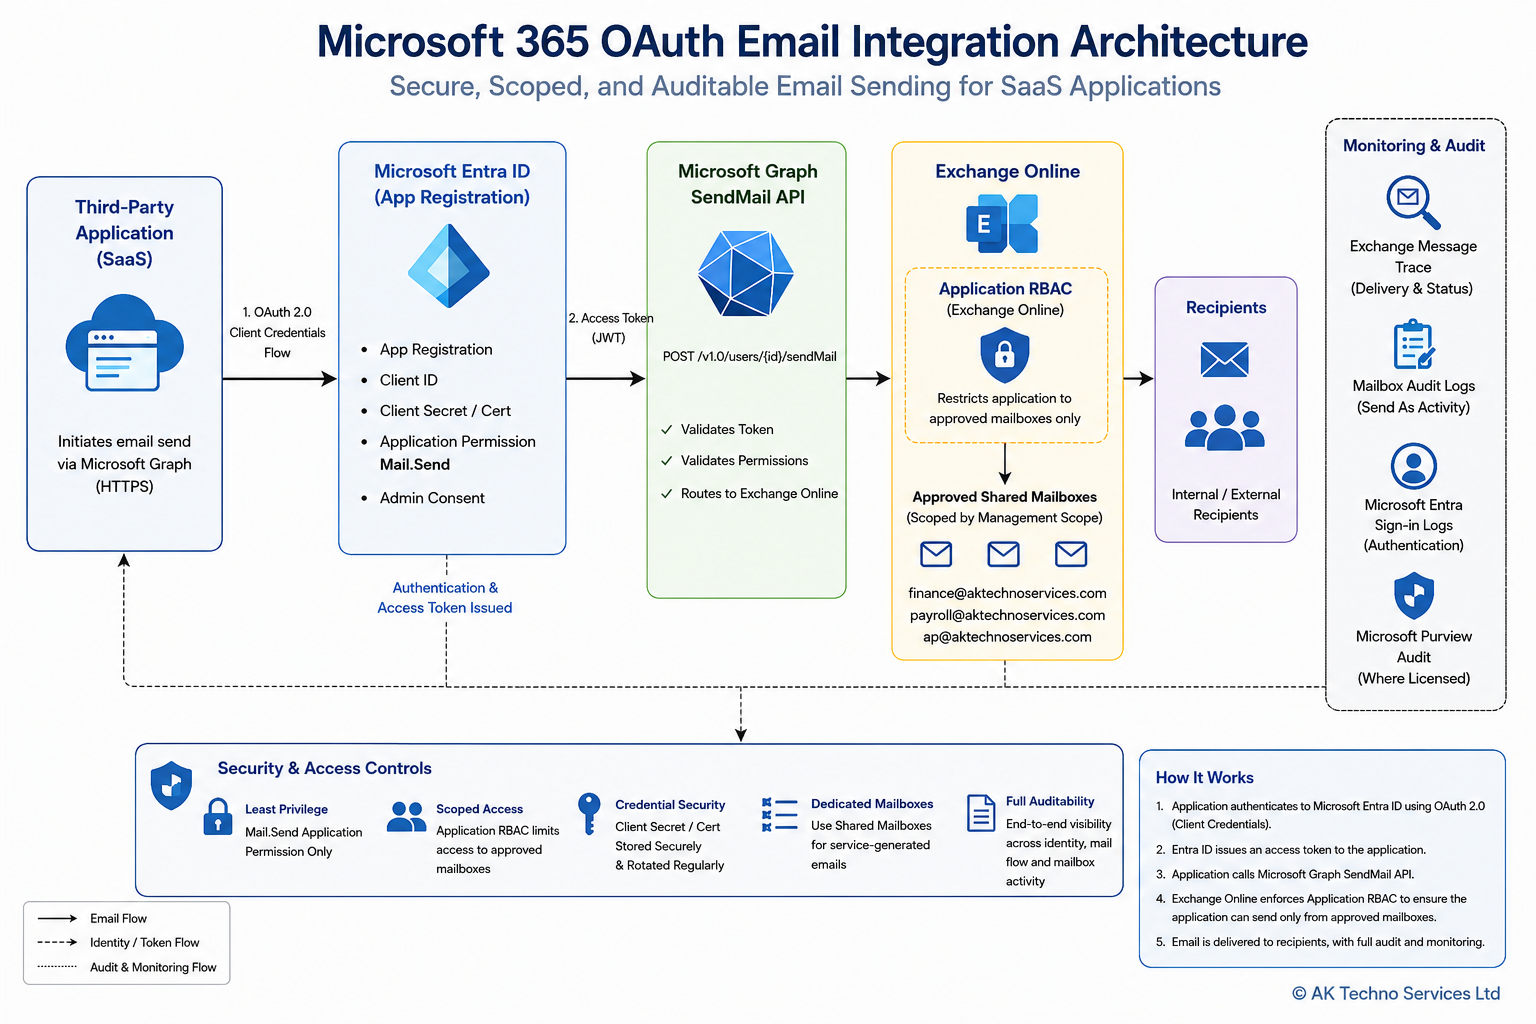
##### **Solution Architecture**
```
Third-Party Application
│
│ OAuth 2.0
▼
Microsoft Entra ID
(App Registration)
│
Access Token
▼
Microsoft Graph API
(Mail.Send)
│
▼
Exchange Online
│
Shared Mailbox
│
Recipients
```
[](https://docs.aktechnoservices.com/uploads/images/gallery/2026-06/77qimage.png)
##### **Overview**
This runbook describes the standard approach for integrating third-party applications with Microsoft 365 using OAuth 2.0 and Microsoft Graph to send email through Exchange Online.
The objective is to provide a secure, repeatable and vendor-agnostic implementation that supports modern authentication while reducing administrative overhead and improving auditability.
##### **Prerequisites**
Ensure the following prerequisites have been completed:
- Microsoft 365 tenant with Exchange Online.
- Microsoft Entra ID administrator privileges.
- Exchange Administrator or Global Administrator role.
- Microsoft Graph API access.
- Dedicated App Registration.
- Dedicated Shared Mailbox(es) for application-generated email.
- Vendor confirmation that Microsoft Graph SendMail is supported.
##### **Workflow**
1. Create Shared Mailboxes.
2. Create an Exchange Management Scope.
3. Create an Exchange Service Principal mapped to the Microsoft Entra App Registration.
4. Assign an Exchange Application Role.
5. Validate access.
6. Review Message Trace and Audit Logs.
##### **Step 1: Create the Microsoft Entra ID App Registration**
Navigate to:
Microsoft Entra Admin Centre
> Identity > Applications > App Registrations > New Registration
Configure:
- Application Name
- Supported Account Type
- Redirect URI (if required by the application)
Record:
- Tenant ID
- Application (Client) ID
Generate a Client Secret and securely record:
- Secret Value
- Secret Expiry Date
##### **Step 2: Configure Microsoft Graph Permissions**
Navigate to:
API Permissions
Add:
Microsoft Graph Application Permission
```powershell
Mail.Send
```
Grant:
Administrator Consent
Do not assign additional Microsoft Graph permissions unless explicitly required by the application.
##### **Step 3: Configure Exchange Online Mailboxes**
Create one or more dedicated Shared Mailboxes for application-generated email.
Examples:
- finance-notification@
- payroll-notification@
- ap-notification@
Avoid using personal user mailboxes.
##### **Configure Exchange Online Application RBAC**
**Objective**
Although the Microsoft Entra ID application is granted the Microsoft Graph Mail.Send application permission, that permission applies broadly across Exchange Online by default.
To enforce the principle of least privilege, configure Exchange Online Application RBAC so that the application can send mail only from the approved shared mailbox(es) required by the third-party application.
This provides an additional layer of authorization beyond Microsoft Graph API permissions and significantly reduces the impact of a compromised application credential.
##### **Step 3.1: Connect to Exchange Online**
Open an Exchange Online PowerShell session.
```powershell
# Install-Module -Name ExchangeOnlineManagement
Install-Module ExchangeOnlineManagement
# Then load it:
Import-Module ExchangeOnlineManagement
# Connect to EXO
Connect-ExchangeOnline
```
##### **Step 3.2: Create a Management Scope**
Create a Management Scope that contains only the mailbox or shared mailbox that the application should be permitted to use.
Example – Multiple Shared Mailbox
```powershell
New-ManagementScope `
-Name "MS Graph Mail Scope" `
-RecipientRestrictionFilter "PrimarySmtpAddress -eq 'finance@contoso.com' -or PrimarySmtpAddress -eq 'payroll@contoso.com' -or PrimarySmtpAddress -eq 'ap@contoso.com'"
```
Verify the scope.
```powershell
Get-ManagementScope "MS Graph Mail Scope"
```
##### **Step 3.3: Locate the Exchange Service Principal**
Before an Exchange Online Application RBAC role assignment can be created, Exchange Online must have a corresponding Service Principal for the Microsoft Entra ID application. If the application is not returned by Get-ServicePrincipal, register it in Exchange Online using the Microsoft Entra ID Application (Client) ID and the Enterprise Application (Service Principal) Object ID.
Verify whether the Service Principal exists
```powershell
Get-ServicePrincipal
```
or
```powershell
Get-ServicePrincipal |
Where-Object DisplayName -eq "MS Graph Mail"
```
Record the following values:
- Display Name
- AppId
- ObjectId
If no results are returned, register the application.
When registering the Exchange Online Service Principal, the `-AppId` parameter must use the **Application (Client) ID** from the Microsoft Entra ID App Registration, while the `-ObjectId` parameter must use the **Enterprise Application (Service Principal) Object ID**, not the App Registration Object ID. Using the incorrect Object ID will prevent Exchange Online from locating the Service Principal.
**Register the Service Principal**
```powershell
New-ServicePrincipal `
-AppId "" `
-ObjectId "" `
-DisplayName "MS-Graph-Mail-Lab"
```
**Verify the registration**
```powershell
Get-ServicePrincipal |
Where-Object DisplayName -eq "MS-Graph-Mail-Lab"
```
The application should now be available for Exchange Online Application RBAC role assignments.
##### **Step 3.4:**
##### **Assign the Exchange RBAC Role**
Assign the **Application Mail.Send** role to the application and restrict it to the Management Scope created above.
```powershell
New-ManagementRoleAssignment `
-Name "MS Graph Mail Assignment" `
-App "" `
-Role "Application Mail.Send" `
-CustomResourceScope "MS Graph Mail Scope"
```
##### **Step 3.5: Validate the Assignment**
Verify the RBAC assignment has been created successfully.
```powershell
Get-ManagementRoleAssignment |
Where-Object Name -eq "MS Graph Mail Assignment"
```
Expected Result
- Application Mail.Send
- Management Scope = MS Graph Mail Scope
- Assignment Status = Active
The above configuration prevents the application from sending email as arbitrary mailboxes within the tenant, even though it has been granted the Microsoft Graph `Mail.Send` application permission.
Test the RBAC
```powershell
Test-ServicePrincipalAuthorization `
-Identity "MS-Graph-Mail-Lab" `
-Resource youremail@contoso.com
```
Exchange Online RBAC for Applications does not consistently enforce mailbox restrictions for Microsoft Graph Mail.Send operations.
To guarantee least-privilege access, Application Access Policies must be configured alongside RBAC when using the Mail.Send application permission.
```powershell
# Run:
Install-Module ExchangeOnlineManagement -Scope CurrentUser
# Then
Import-Module ExchangeOnlineManagement
Connect-ExchangeOnline
# Create a mail-enabled security group
New-DistributionGroup -Name "Graph-Mail-Allowed" -Type Security
# Add ONLY the allowed mailbox
Add-DistributionGroupMember -Identity "Graph-Mail-Allowed" -Member your-email@aktechnoservices.com
# Create the policy
New-ApplicationAccessPolicy `
-AppId "" `
-PolicyScopeGroupId "Graph-Mail-Allowed" `
-AccessRight RestrictAccess `
-Description "Restrict mail send to approved shared mailbox only"
# Test it
Test-ApplicationAccessPolicy `
-AppId `
-Identity your-email@aktechnoservices.com
# Test the blocked one:
Test-ApplicationAccessPolicy `
-AppId `
-Identity test-sharedmailbox@aktechnoservices.com
```
Wait ~30 - 60 mins to allow it to propagate and then test.
##### **Step 4: Configure the Third-Party Application**
Provide the vendor with:
- Tenant ID
- Application (Client) ID
- Client Secret Value
- App Registration Name
- Approved Shared Mailbox addresses
Ensure the application is configured to use Microsoft Graph SendMail rather than SMTP where supported.
##### **Step 5: Security Configuration**
Apply the principle of least privilege.
Recommendations:
- One App Registration per application.
- One Client Secret per application.
- Shared Mailboxes for service identities.
- Secure storage of Client Secrets.
- Regular secret rotation.
- Review Graph permissions periodically.
##### **Step 6: Testing**
Validate the implementation using a non-production Shared Mailbox.
Confirm:
- OAuth authentication succeeds.
- Microsoft Graph token is issued.
- Email is delivered successfully.
- Sender address is correct.
- Message appears in Sent Items (where configured).
- External recipients receive the message.
Complete User Acceptance Testing before production deployment.
##### **Step 7: Monitoring & Validation**
Validate successful operation using:
- Exchange Message Trace
- Exchange Mailbox Audit Logs
- Microsoft Entra Sign-in Logs
- Microsoft Purview Audit (where licensed)
Investigate any authentication failures, delivery issues or unexpected mailbox activity before production rollout.
##### **Step 8: Production Go-Live**
Move to production once:
- Testing is complete.
- Security review has been approved.
- Vendor validation has been completed.
Following deployment, monitor:
- Authentication failures
- Mail delivery
- Audit logs
- Secret expiry
- Application health
##### **Operational Maintenance**
Perform the following operational tasks regularly:
- Rotate Client Secrets before expiry.
- Review Microsoft Graph permissions.
- Review mailbox access permissions.
- Monitor Exchange Message Trace.
- Review Microsoft Entra Sign-in Logs.
- Remove unused App Registrations.
- Decommission unused Shared Mailboxes.
##### **Important Considerations**
- Avoid sharing App Registrations across multiple applications.
- Do not expose Client Secret values in documentation or email.
- Validate vendor support for Microsoft Graph before implementation.
- Shared Mailboxes should be used exclusively for application-generated email where practical.
- Ensure application credentials are securely stored and rotated in accordance with organisational policy.
##### **Best Practices**
- Prefer Microsoft Graph over SMTP AUTH for new integrations.
- Create dedicated Shared Mailboxes for each business function.
- Maintain one App Registration per application.
- Use Exchange Online Application RBAC to restrict Microsoft Graph applications to approved Shared Mailboxes. Microsoft Graph `Mail.Send` alone does not restrict which Exchange Online mailboxes an application may use. Exchange Online Application RBAC should be implemented to limit the application's operational scope.
- Enable auditing before production deployment.
- Document all configuration values securely.
- Perform regular operational reviews.
##### **References**
- Microsoft Graph API Documentation
- Microsoft Entra ID Documentation
- Exchange Online Administration Documentation
- Microsoft 365 Security Best Practices
##### **Summary**
This runbook provides a standardised approach for integrating third-party applications with Microsoft 365 using OAuth 2.0 and Microsoft Graph. By adopting dedicated App Registrations, Shared Mailboxes and least-privilege permissions, organisations can deliver a secure, auditable and repeatable email integration model that can be reused across multiple SaaS applications.